Showing posts with label Yeast. Show all posts

Tuesday, June 8, 2010

Cinnamon coffee buns with a twist...


Speaking of the Finns, let's talk coffee buns. And coffee.

Finns drinking the most amount of coffee per year per capita. Yep, more than Italians, more than the French. They drink it black, they drink it often. They drink it alone, they drink it when friends come to visit. First thing in the morning, until late into the night, Finns have a pot of liquid black gold on the boil. It is part of the nature of being a Finn.

My mother in law started drinking coffee before the age of 10. My sister in law who despised coffee learnt to love it on a five week adventure there. Previously I've always taken milk with my coffee, but after a visit there when I was repeatedly offered black coffee around four times daily I learnt that the stuff is not so bad. In fact, a black coffee is refreshing. And is perfect with a pastry.

Mmm, pastry. Finnish pastry. Filled with berries, or sugar, or cardamom. Sweet and oozing with syrup. A great off set to a strong, somewhat bitter black coffee. The pastry that I believe trumps them all also happens to be the most common. Pulla. But say it with a soft p sound, more like "bulla". Cinnamon, cardamon and sugar. Rolled into a log of dough, sliced into wedges and squeezed somewhat. So the lays of spices poke out. In Finland, you have it served on planes, it can be bought from a 7-11. Bakeries make dozens of them daily, and your neighbour will have a few stashed away in the freezer for when coffee and company needs to be had.

These are fiddly to make. And they take time. But you make so many. And they are so delicious. A little taste of Finland.

Pulla
Makes up to 3 dozen

250 mg milk
100 g caster sugar
2 small dsp dried yeast
1 egg, lightly beaten
125 g butter, softened
2 tsp cardamon seeds, ground (ideally in a mortar and pestle)
1 tsp salt
650 g flour
2 tsp ground cinnamon
50 g caster sugar, extra, plus a little more
80 g butter, softened
1 more egg, lightly beaten

Warm your milk gently in the microwave until tepid. Add the sugar and yeast, whisk to combine and set aside for 10 minutes to get the yeast going. It will get frothy and foamy. Add to this the egg, butter, cardamon and salt. Slowly add the flour, bit by bit. You can do this process in your mixer (as I do) if that's easier.

Kneed the dough until it is smooth and soft, for around 5 minutes. Place into a greased bowl, cover with gladwrap and leave to prove for around an hour in a warm place, until doubled in size.

Mix together the cinnamon, sugar and butter. Set aside. This will be your sticky filling between layers of dough. Yum!

Punch down the leaven dough, divide into quarters. Using a rolling pin, roll out quarter of the dough into rectangles a few millimetres thick. Spread a quarter of the cinnamon mix over the rectangle of dough, before rolling it up to a log. This will be a spiral that has cinnamon butter between each layer. Using a knife, cut the log into pieces. But cut on an angle, so you get a good surface area of layers revealed. Make your cuts so that each little pulla is shaped like a "v" or a triangle. Place the pulla larger surface down onto a lined baking tray, and push your thumb into the point of the bun. This will push your layers of dough out encouraging the ooze of filling. Repeat this process with remaining dough and cinnamon butter. Cover and leave to prove in a warm place for a further thirty minutes or so.

Mean while pre-heat the oven to 180* C.

Once your pulla have risen again, brush them with the remaining beaten egg and sprinkle with sugar. Bake in the oven for around 15-20 minutes, until golden and risen. Set aside to cool a little and enjoy with coffee. Store once cool in an air-tight container for a few days, or freeze for later.

One for the Fins...

Finnish grandmas have been making this bread for years. Years and years. And between loaves of this bread, they don't wash out the bowl. Consequently real Finnish rye bread is dark in colour. As dark as a gloriously intense 75% cocoa chocolate bar. And fragrant. Full of yeast and rye smells. That knock you out. That are perfect with cheese, or jam, or cheese and jam. Perfect with smoked salmon, with herrings, with boiled egg. Dense chewy bread, that you rip when you bite into. That lasts and lasts and improves with time.

At least, this is what the fella told me. "You should try real Finnish bread," he informed me, "but this is pretty good".
Finish-Style Rye Bread
Makes a solid loaf

225 g rye flour
300 g white flour
7 g dried yeast
1 tbs dark brown sugar
2 good pinches of salt
300 ml warm water
1 tbs melted butter

Using either a bowl or a mixer (such as a KitchenAid with dough hook attachment) combine the flours, yeast, sugar and salt. Slowly add the water until the mixture begins to come together. Add the melted butter to make a cohesive dough.

Now either kneed by hand for around 10 minutes, or mix in your mixer for half of that time. Your dough will be smooth but really heavy. This is not white bread, it won't stretch and be luscious rather be compact and solid.

Oil a bowl, turn the dough over in it and cover the bowl with gladwrap. Leave in a warm place to prove. This could take a while, so be patient and maybe wait overnight even. You won't get a puffy glorious rise, cause there is little yeast to the heavy flour, but you will get a rise to around twice the original size of the dough.

Pre-heat oven to 190* c. Line a baking tray with paper.

Knock down the dough, shape it into a loaf and leave to prove for a further 30 to 45 minutes. The loaf should again puff up a little and become lighter.

Bake in your heated oven for 45 or so minutes, until cooked through. Leave to cool and eat with joy.

From Nigella Lawson's How to be a Domestic Goddess.

Saturday, April 10, 2010

Building family traditions...

Easter has come and gone, so perhaps it is too late to put some seasonal treats up. Between Easter and today we have gone through quite a few ups and downs, one of them being that this bad boy computer needed a visit to the repair man. But the comp is back in action, and the cooking continues. After all, just this past week a relative reported that we are "still in octave of Easter."

As for Easter, I made a number of treated that I really enjoyed, and a few that flopped and hopefully will not grace the Easter table again. Two old favourites were whipped up - the Maundy Thursday fish pie and the eastern European Easter bread. We had the pie with friends, and yet again forgot to watch the Passion of the Christ. Having friends over is a new bit of the tradition, forgetting to watch this chilling film is usual fare. Each year a I make the pie with differing fish, add a few prawn and take hours cooking it, which mean we don't eat until very late. But it is important to build memories, and I believe that memories are aided by tradition.

As for the Easter bread, oh, so good! It is truly rewarding to make. The yeast simply rises and rises the leaven loaf. It is speckled with sultanas and glistens under an egg wash coat. Plus coloured hard-boiled eggs are wedged into the folds of the bread's plat. Eat it hot on the Easter holidays, toast it in the week following for breakfast. Delicious. And traditional also. My mother-in-law requests this yearly. It reminds her for food she ate in Finland as a child. So I always bring it to Easter Sunday lunch. After getting up at 0600 hrs to prepare it. So I wake early, put the coffee pot on the stove and get baking. This year with the aid of my ruby-red KitchenAid this bread was a breeze.

I hope you enjoyed some seasonal baking, and have fun building traditions with those who are important to you.

Eastern European Easter Bread a.k.a Kuliza
Makes one very large loaf or a number of smaller ones.

14 g dried yeast
50 g warm water
1/3 c sugar
3 1/2 c flour
1 tsp ground cinnamon
1 tsp dried ginger
1 c sultanas
zest of a lemon
150 ml milk
60 g butter
4 eggs
Up to 100 mg water, extra


Place yeast, water and 1 tbs sugar in a bowl. Stir to combine and then set aside to bubble and froth and get your leavening process started.

Combine flour, spices, sultanas and zest in the bowl of your mixer. Combine the milk and butter in a bowl. Heat gently in the microwave for 30 seconds to soften the butter and warm the milk. Stir this along with the yeast mix, 3 eggs lightly beaten and a little of the water into the flour mixture. Using a dough hook, kneed in the mixer until dough is smooth and lovely. Add more water if you need, but don't make the dough too sticky. Alternative mix by hand and kneed for a good while to form a similarly smooth dough.

Remove to a greased bowl, cover and leave to prove for an hour or so until doubled in size. Punch down the dough, divide it into three pieces and roll these pieces out. Make them long and of an equal length, before platting together and placing onto a lined tray. Or you could make a few little loaves in a similar fashion. Cover with a tea towel and leave to prove again for around an hour.

Make the coloured eggs during this hour and also pre-heat the oven to 190* C.

Place the eggs along the centre of the dough, brush with the remaining egg before baking in the oven for 25 minutes for a large loaf and 15 minutes for the small loaves.

Serve warm with butter.

Coloured Eggs

4 eggs
1 tsp red food colouring
water to cover the eggs

Place the eggs into a small saucepan. Cover with water and pour over the food colouring. Bring to the boil before simmering for 10 minutes. Remove from heat and leave to cool in the coloured water for 30 minutes to set the colour. Remove from water and allow to dry.

Originally from a Delicious magazine, now just from my adaptations.

Tuesday, March 23, 2010

Hotties for Easter...

Seasonal baking, great in theory but challenging to implement in practice. Whenever Christmas comes around I'm too exhausted from the year to prepare those puddings in advance, to make the fruit mince and then the pies, to roll and cut out Christmas tree cookie decorations, to lovingly prepare jars of jam as gifts. I always want to, but struggle in the end. Similarly with Valentine's Day or St Patrick's. Not that Aussies are really in to these "holidays".

But with Easter I try to make the effort. We have traditions for Thursday night, with fish pie and the Passion of the Christ dvd. I get home and poach fish in stock, layer it in a dish, make a milky sauce, boil potatoes and place the lucious pie into the oven. By this time it is almost 9 p.m. and who is keen on eating anyway. But the pie and any leftover peas get us through the weekend, between visits to families where we are stuffed full of lamb.

And the best culinary delight of Easter? Has to be the hottie. Yum oh! How I love hot cross buns. Light morsels, speckled with fruit, flavoured with spices, that white cross on the top which is beging to be picked off and eaten first. This is one thing I make yearly, and indeed weekly in the month leading up to Easter. Just whipping up our second batch for the season now.

Hot Cross Buns
Makes up to 20 or so

1/4 c water
4 tsp dried yeast
2 tbs sugar
4 c flour
1/2 c sugar
3 tsp spices
At least 1 c dried fruit
2 eggs, lightly beaten
3/4 c milk
1/4 c butter
1/4 c flour, extra
2 tsp sugar, extra
more water
1/4 c sugar, again extra
1/8 c water, heated

Combine 1/4 c water, yeast and 2 tbs sugar in a bowl. Whisk to combine and set aside for around 10 minutes to get started. This kicks the yeast process along, but is not entirely necessary. Feel free to simply tip the yeast (forget the water and sugar) in with the flour at the next step.

Combine flour, 1/2 c sugar, spices and dried fruit in a bowl. The spices should be ground if dried. They can include any flavours you like. Most recently I've been using cinnamon, dried ginger and the zest of an orange. Cardamom or nutmeg is also nice. With the dried fruit, chop it up finely and use tasty combinations. Nothing beats currents and sultanas, but dried apricots, pears and figs are great too.

Add the yeasty mix, the eggs along with the milk and butter. But first combine the milk and butter in a microwave safe container and heat gently for 30 seconds. This will soften your butter and again help with the yeast process of things being warm and at the optimal temperature to rise! Kneed until the dough is soft and elastic, either on the bench by hand or in a mixer with a dough hook (I use the mixer).

Lightly grease a bowl, place dough in it, cover and leave in a warm spot to prove for around an hour. The mixture will double in size.

Punch down the dough, divide the mixture in half and then form from this into small balls of around 7 cm diameter. This is not absolutely required, but easy to achieve if you keep on dividing the dough in half until you have nice little bun-sized balls. Place on a lined baking tray, cover and leave to prove for a further 30-40 minutes. Turn on the oven at this time to 180* C.

Mix together the extra flour, sugar and water to form a paste. Using a piping bag or some other device, use this paste to form crosses on top of the buns. Bake in the oven for around 15 minutes, until golden and cooked through. Meanwhile combine the sugar and hot water. When the buns come out of the over, brush this sugary glaze over the top of the buns. Leave to cook somewhat before tearing appart, smothering with butter and eating with greedy passion.

Recipe adapted from too many sources, now just my own.

Christ is Risen!

Wednesday, March 10, 2010

A bush holiday breakfast...


We had a simply lovely, delayed Labour Day long weekend away. Yep, went to the country on Monday night, came home mid-Wednesday. It meant we missed the traffic, and the house belonging to friends was available for a retreat. How lovely to do lots of holiday things - sleeping in, a snuggley doona to burrow under, sitting by the fire reading and knitting, playing our new board game until the cows come home, seeing rabbits bound around the yard, dreaming of having my own holiday house in the country one day...

And baking.

With yeast.

On holidays.

Surely this is too much work, you are thinking. Normally I would agree to. But I wasn't the one doing the baking. I was the one doing the eating. Yum. That's right. The fella baked. Firstly, he made a walnut-speckled round of bread. Great with blue cheese. Then while I was napping, he whipped up a batch of biscuits - with more of those walnuts, along with chunks of white and milk chocolate (I'm planning on giving this recipe a test as it was a bit of a winner). Then he made pizza dough.

By this stage we were both exhausted and fell asleep (that's me going to sleep again after a long nap). So no pizza was had. Which left us with options for breakfast. In our house, holidays normally mean bacon and eggs but with left over pizza dough what were we to do?

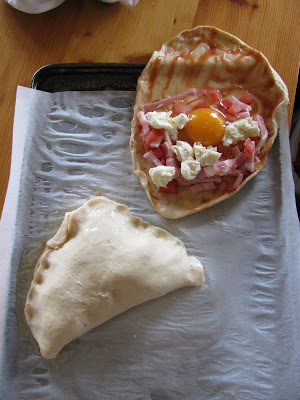
Breakfast calzone anyone?
Breakfast Calzones
Serves 4 generously

Pizza dough
2 tsp dried yeast
1 tsp sugar
4 tbs warm water
2 c plain flour
1 egg
2 1/2 tbs milk
1 tsp salt

Calzone
4 tbs tomato paste
1 tomato
4 rashes short bacon
4 eggs
8 balls bambini boconccini

To make the dough, combine yeast, sugar and water in a bowl. Whisk to combine and set aside for a little while to get the yeast kick started. The mixture should froth and form a funky looking top. Sift the flour into a bowl or onto the bench (if you are feeling al naturale), make a well in the centre. Add the remaining dough ingredients, along with the yeasty mix. Slowly bring in the sides until combine. Turn out and kneed for a good 10 minutes (or simply undertake this entire process in your mixer for very little effort and reduced time).

Oil a bowl, place the dough in it and turn to grease the dough. Cover and leave to prove in a warm place for an hour, until large and risen and fluffy. Pound down, gently kneed and leave to prove again for a further thirty minutes or so. If you are doing this the night before, place into the fridge to prove overnight.

Pre
-heat the oven to 180* C. Line two baking trays with paper.

Divide dough into quarters. Roll out gently to form ovals. Place the ovals onto the trays. Cover half of each oval with a tablespoon of tomato paste. Dice tomato and combine with diced bacon. Sprinkle this mix over the tomato paste on each of the ovals, trying to make a wall around the edges. Crack an egg into the centre of each calzone - hence the need for the bacon and tomato wall. Break up the boconccini and scatter over the top, season with a good grind of pepper. Fold the ingredient-free half over the filled half, pressing the edges to seal. If you have a leak of egg, brush this over the top of the sealed calzones.

Bake in the oven for around fifteen minutes, until golden and cooked through. Leave to cool on trays for around five minutes, before enjoying with some Tabasco or relish.

Dough recipe from Marie Claire Kitchen.

Saturday, November 7, 2009

Flatbreads, flat out

Have you ever gotten into baking bread? I mean, really worked at it, baked often, improved recipes, tried new techniques... When I was fifteen, I discovered focacia. And fell in love with it. I tried to follow pack mixes, I made loaves from scratch. I was hooked. So hooked, that when our kitchen was being renovated I needed to stop the builder from removing the oven from the wall as I had a focacia cooking inside. That could have been a tragic moment!


While I still enjoy a slice of focacia or two, I don't make it often now. Rather we bake bread for daily consumption. Stuff that can be sliced and placed into the toaster. Stuff that works as a sandwich. Stuff that is made for vegemite and butter.


But I still love a baking challenge. Not too long ago, I tried Martha Stewart's recipe for baguettes. This had some moderate success. I will also turn to How to be a Domestic Goddess when needing to create a yeasty produce. This recipe though, is from a faithful magazine. The Aussie success that is Delicious. I have no recollection of buying this particular magazine, although for a while I was receiving the second hand copies from my cooking sis Rach. I have used this particular issue often. It has been chewed by one of my hunry felines and chunks of the cover are missing. It contains the recipe inspiration for one of my favourite salads - rocket, boconccini, roasted capsicum and onions, olives, a citrus dressing! It has a pistachio and zucchini cake I long to bake. And it has these little babies.


These flatbreads are easy to prepare, perhaps a little fiddly to shape, but a rewarding bake. They are really not too much effort, and are far superior to the comercial versions from expensive delis. They only prove once, bake for less than 10 minutes and also keep for up to a week. The chilli flavour is subtle - add more if you are keen. But the subtleness makes these flatbreads versitile, ensuring they work work with most toppings.


Herb and Chilli Flatbreads

Makes 36 or so


1 tsp dried yeast

Pinch sugar

1 ¾ c. plain flour

2 tsp dried herbs – oregano, thyme, etc

2 red chillies, finely diced

½ tsp salt

Spray oil


In the bowl of your mixer, combine yeast, sugar ¼ c. flour and ¼ c. tepid water. Leave to sit and bubble for around 20 minutes. Meanwhile, sift the remaining flour into a bowl. Add the herbs and chilli. Stir to combine. Attached the dough hook to your mixer, add the flour mix to the bubbling yeast. Stir on a low speed to combine somewhat. Increase the mixer’s speed to medium, slowly add around ½ c. more of tepid water, adding a little at a time. When the mixture is coming together as a dough, stop adding water. Beat the dough for three minutes or so, until deliciously soft and smooth. Remove the dough to an oiled bowl, cover with a tea towel (or glad wrap if you use it), and leave in a warm spot to prove for an hour until doubled in size.


Ensure the oven is divided into thirds. Pre-heat the oven to 200C. Line three trays with baking paper.

Punch down on the dough to deflate it. Divide into two pieces, and roll into logs. Cut slices off the logs around 5 mm in diameter. Using a rolling pin, roll out the pieces into little ovals of dough. Place onto the lined trays, around 12 ovals per tray. Repeat, using up all of the dough. If desired, spray the ovals with oil. I often forget to do this – in the pictures, the pieces are not golden brown as a result of my forgetfulness. Bake in the oven for 8 minutes, until cooked and beginning to golden. Rotate the trays in the oven after 4 minutes of cooking to ensure even browning.


Rest on the trays for a few minutes before transferring to a wire rack to cool completely. Serve with a chunky dip, with a cream cheese spread on top or some other delicious topping. These little flatbreads will keep fresh for up to a week in an airtight container.


Adapted from Delicious Magazine February 2007.

They are also tasty with a gin and tonic (add a spritz of lime if you please) for afternoon tea.