Tuesday, June 8, 2010

Cinnamon coffee buns with a twist...


Speaking of the Finns, let's talk coffee buns. And coffee.

Finns drinking the most amount of coffee per year per capita. Yep, more than Italians, more than the French. They drink it black, they drink it often. They drink it alone, they drink it when friends come to visit. First thing in the morning, until late into the night, Finns have a pot of liquid black gold on the boil. It is part of the nature of being a Finn.

My mother in law started drinking coffee before the age of 10. My sister in law who despised coffee learnt to love it on a five week adventure there. Previously I've always taken milk with my coffee, but after a visit there when I was repeatedly offered black coffee around four times daily I learnt that the stuff is not so bad. In fact, a black coffee is refreshing. And is perfect with a pastry.

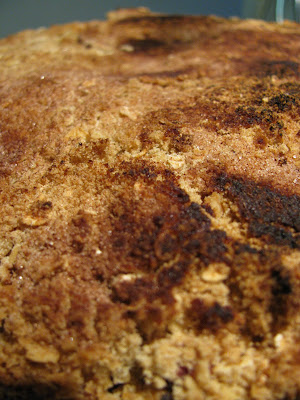
Mmm, pastry. Finnish pastry. Filled with berries, or sugar, or cardamom. Sweet and oozing with syrup. A great off set to a strong, somewhat bitter black coffee. The pastry that I believe trumps them all also happens to be the most common. Pulla. But say it with a soft p sound, more like "bulla". Cinnamon, cardamon and sugar. Rolled into a log of dough, sliced into wedges and squeezed somewhat. So the lays of spices poke out. In Finland, you have it served on planes, it can be bought from a 7-11. Bakeries make dozens of them daily, and your neighbour will have a few stashed away in the freezer for when coffee and company needs to be had.

These are fiddly to make. And they take time. But you make so many. And they are so delicious. A little taste of Finland.

Pulla
Makes up to 3 dozen

250 mg milk
100 g caster sugar
2 small dsp dried yeast
1 egg, lightly beaten
125 g butter, softened
2 tsp cardamon seeds, ground (ideally in a mortar and pestle)
1 tsp salt
650 g flour
2 tsp ground cinnamon
50 g caster sugar, extra, plus a little more
80 g butter, softened
1 more egg, lightly beaten

Warm your milk gently in the microwave until tepid. Add the sugar and yeast, whisk to combine and set aside for 10 minutes to get the yeast going. It will get frothy and foamy. Add to this the egg, butter, cardamon and salt. Slowly add the flour, bit by bit. You can do this process in your mixer (as I do) if that's easier.

Kneed the dough until it is smooth and soft, for around 5 minutes. Place into a greased bowl, cover with gladwrap and leave to prove for around an hour in a warm place, until doubled in size.

Mix together the cinnamon, sugar and butter. Set aside. This will be your sticky filling between layers of dough. Yum!

Punch down the leaven dough, divide into quarters. Using a rolling pin, roll out quarter of the dough into rectangles a few millimetres thick. Spread a quarter of the cinnamon mix over the rectangle of dough, before rolling it up to a log. This will be a spiral that has cinnamon butter between each layer. Using a knife, cut the log into pieces. But cut on an angle, so you get a good surface area of layers revealed. Make your cuts so that each little pulla is shaped like a "v" or a triangle. Place the pulla larger surface down onto a lined baking tray, and push your thumb into the point of the bun. This will push your layers of dough out encouraging the ooze of filling. Repeat this process with remaining dough and cinnamon butter. Cover and leave to prove in a warm place for a further thirty minutes or so.

Mean while pre-heat the oven to 180* C.

Once your pulla have risen again, brush them with the remaining beaten egg and sprinkle with sugar. Bake in the oven for around 15-20 minutes, until golden and risen. Set aside to cool a little and enjoy with coffee. Store once cool in an air-tight container for a few days, or freeze for later.

One for the Fins...

Finnish grandmas have been making this bread for years. Years and years. And between loaves of this bread, they don't wash out the bowl. Consequently real Finnish rye bread is dark in colour. As dark as a gloriously intense 75% cocoa chocolate bar. And fragrant. Full of yeast and rye smells. That knock you out. That are perfect with cheese, or jam, or cheese and jam. Perfect with smoked salmon, with herrings, with boiled egg. Dense chewy bread, that you rip when you bite into. That lasts and lasts and improves with time.

At least, this is what the fella told me. "You should try real Finnish bread," he informed me, "but this is pretty good".
Finish-Style Rye Bread
Makes a solid loaf

225 g rye flour
300 g white flour
7 g dried yeast
1 tbs dark brown sugar
2 good pinches of salt
300 ml warm water
1 tbs melted butter

Using either a bowl or a mixer (such as a KitchenAid with dough hook attachment) combine the flours, yeast, sugar and salt. Slowly add the water until the mixture begins to come together. Add the melted butter to make a cohesive dough.

Now either kneed by hand for around 10 minutes, or mix in your mixer for half of that time. Your dough will be smooth but really heavy. This is not white bread, it won't stretch and be luscious rather be compact and solid.

Oil a bowl, turn the dough over in it and cover the bowl with gladwrap. Leave in a warm place to prove. This could take a while, so be patient and maybe wait overnight even. You won't get a puffy glorious rise, cause there is little yeast to the heavy flour, but you will get a rise to around twice the original size of the dough.

Pre-heat oven to 190* c. Line a baking tray with paper.

Knock down the dough, shape it into a loaf and leave to prove for a further 30 to 45 minutes. The loaf should again puff up a little and become lighter.

Bake in your heated oven for 45 or so minutes, until cooked through. Leave to cool and eat with joy.

From Nigella Lawson's How to be a Domestic Goddess.

Friday, May 28, 2010

Choc chip cookies continued...

Previous posts have documented a quest for the choc chip cookie to be perfected. Perhaps my problem with this quest starts with the fact that in Aus, I should be searching for a choc chip bickie not cookie!

These are pretty good though. Initially whipped up by the fella when we went away for a weekend. Currently they are my go-to staples when it comes to choc chip biscuits. Are they that good though that experimenting with recipes will cease? I think not. The mix can be temperamental at times. With flat, fuzzy edged biscuits. Or hard as little frisbees if given a few minutes too long. But when they work, oh they are good!

I hope you have success with these.

Choc Chip Biscuits Take 2
Makes around 3 dozen small biscuits

125 g butter, softened
1 c brown sugar, gently but firmly packed
1 tsp vanilla
1 tbs milk
1 egg, lightly beaten
1 1/2 c flour
1 tsp baking powder
200 g choc chip bits
100 g nuts, diced (walnuts, hazelnuts, etc)

Pre-heat oven to 180* C fan-forced. Divide oven shelves into thirds. Line three baking trays with paper.

Beat butter with brown sugar. Using a mixer is ideal - give it around three minutes to be light and fluffy. Add vanilla, milk and egg, beat briefly to combine. Gently stir in the flour and baking powder. Turn off the mixer and add the choc chip bits and nuts. Stir to combine.

At this point, your biscuit mixture may benefit from a rest in the fridge to firm things up. Even 15 minutes could be good. But if it is not too soft, get on with the baking. Using a spoon, heap small rounds of mixture onto your prepared trays. They can be any size really, but I find balls around 3 cm in diameter or so work well - more than a mouthful but not a complete meal.

Cook in the oven for around 8 minutes. Check at this point and give the biscuits more time if needed. Remove and cool on the trays for 5 or so minutes before transferring to a wire rack to cool completely.

Enjoy with a cup of tea. Store in an air-tight container for up to a week. Alternatively, once the balls of dough have been formed and placed onto the trays, freeze. Once frozen, place in bags of around a dozen. Then when you need a snack, there are biscuits that only need to be cooked (or dough eaten from frozen).

Adapted from Michele Cranston's Marie Claire: Kitchen, the Ultimate Recipe Collection.


Parmigiana if you please...

Recently a friend commented that parmas are a Melbourne thing. And indeed I think that she is right. Sure, they are done in other cities but not with the passion that comes from Melbourne. Pubs routinely have parma and pint (pot if stingy) nights. For very little money you get a warm meal and cool drink. With a few chips and a limp salad on the side. The fella finds it hard to resist a parma and pint deal, so when I found this Jamie recipe I simply had to make it.

Not that I've not made parmas before. But it looked so enticing. And the fella was hanging out for one, in fact longing for one, refusing to eat at places that don't serve it (thus rejecting both Subway for a quick feed and the local pizza place). What else could I do but make one? To quieten him at least! And I am glad that I did. For this recipe is a winner. I will make it again any day. Thank you Mr Oliver!

Chicken Parmigiana
Serves 2, double for 4.

Splash of olive oil

2 cloves garlic, peeled and finely chopped
3 anchovies
2 red chillies
400 g tin diced tomatoes
salt and pepper to taste
2 handfuls breadcrumbs, freshly made in a processor
1 handful grated pecorino
Zest of 1 lemon
100 g plain flour
1 egg, beaten
2 small chicken breasts
few basil leaves
small amount of mozzarella cheese

Pre-heat oven to 200 * C.

Place a frying pan over medium heat, add a slosh of olive oil. Add the garlic and anchovies, cook until fragrant. Add the chillies, smoshing them in the sauce a little, along with the tomatoes. Bring to the boil, reduce heat to a simmer and cook for 10 minutes or so until thickened. Season to taste. Remove mixture to the base of an oven-proof dish in which you will cook the parmigianas. Wipe out the pan.

Meanwhile, mix the breadcrumbs with pecorino and zest. Place this onto a plate. On another plate place flour and season it. On another plate (this one with some lip) add the egg. Beat the chicken breasts with a meat cleaver until flattened. You want them around 5 mm thick, and even all over. Coat the chicken with flour, dip it into the egg and then into the breadcrumb mixture. Press it down and ensure that the entire breast is covered with crumbs.

Heat the frying pan again over a medium heat and add another slosh of olive oil. Cook the chicken until golden and generally cooked through - around 3 minutes per side. Place the chicken on top of the tomato sauce mixture in to oven-proof dish. Place a few basil leaves on top of the chicken, then cover the leaves with cheese. I cut the cheese from a large round into small disks and placed them on top of the chicken, leaving some surface area cheese-free.

Bake in the oven for around 15 minutes or so, until the cheese is melted and the dish is cooking together. Enjoy with a salad or side of corn on the cob.

From Jamie Oliver's Jamie's America.

Tuesday, May 25, 2010

A healthy breakfast considered...


Quick and easy breakfast solutions. I have searched for them, have you? Toast on the run, done. Cereal when you arrive at work. Fruit smoothy with some muesli thrown in. Pancakes on weekends. Bacon and eggs. Bagels, etc, etc.

Muffins though, are just an excuse to eat cake first thing. And sometimes I feel guilty about this. Surely I should maintain and promote healthy eating. Surely I should make wise, considered choices about what I eat. I should look after myself now for the longer term. Maybe these muffins count towards this... maybe.

Made with breakfast cereal, these muffins could be considered healthy. Bran and sultanas, super healthy. With fresh fruit also! I try to convince myself... I originally considered making these when I found a recipe posted by Joy the Baker for a similar creation. She made up the batter at the beginning of the week and then cooked fresh muffins each morning. Would it work with this recipe? Perhaps the fresh pear would render it undesirable. Oh well, simply make up a dozen, refrigerate and heat each morning in the microwave to enjoy with coffee.

Sultana Bran & Pear Muffins
Makes 12

Around 1 3/4 c sultana bran, or similar cereal
1 1/2 c flour
3 tsp baking powder
1/2 c packed brown sugar
1 tsp cinnamon powder
1/2 tsp all spice
1 pear, cored and diced finely
3/4 c milk
1 tsp white vinegar
75 g butter, melted
2 eggs, beaten

Pre-heat oven to 180* C. Line a muffin tray with papers.

Combine dry ingredients with the diced pear in a bowl.

In a separate bowl, combine the milk and vinegar. Leave to sit for around 5 minutes. This will sour the milk and make it thicken. For some reason, muffins often call for buttermilk or this soured milk. The theory is that the end product is light due to this process. Add the butter and eggs, stir to combine.

Mix the wet ingredients gently into the dry ingredients until just combine. Scoop into the muffin tray.

Cook in the oven for around 15 minutes, until golden, risen and cooked. Enjoy either warm for breakfast or as they are.

Adapted from the Coles brand Sultana Bran equivalent cereal box.

Monday, May 24, 2010

Knocking on about gnocchi...

Simply years ago I made gnocchi. When I was a girl and dreaming of falling in love with an Italian man and living in Florence. The gnocchi was copious in abundance, stodgy and lumpy. The Italian man never eventuated.

While at boarding school I ate my share of gnocchi. It came from a packet and was served on Friday nights with an out-of-a-can tomato sauce. While I thought I loved it, in reality it tasted ordinary.

Occasionally when we go out for a meal, I will order the gnocchi. With a basil pesto and cream sauce. Never am I impressed as I expect to be.

The other day, I made gnocchi. And it was amazing! Why have I put up with ordinary gnocchi for years? The fella loved it also, and ate and ate and ate until all six serves was gone. As some would say, this recipe "is going straight to the pool room".

Gnocchi with brie
Serves up to 6.

1 kg potatoes
1/2 c parmesan, grated
2/3 c plain flour, sifted, plus extra
salt and pepper, to taste
2 eggs yolks
40 g butter, diced
small wheel of brie, diced
extra parmesan, grated

Pre-heat oven to 180* C.

Line a baking tray, place potatoes on it and roast for 45 - 60 minutes, until the insides are soft and the skin is crispy. Remove and cool some what.

Scoop flesh out of potato skins, mash until smooth. Add parmesan and flour, stir to combine. Season to taste. Add the yolks, stir to make a smooth, cohesive mixture. Turn out onto a floured bench. Kneed for two minutes until smooth. Divide mixture and roll into logs a centimeter thick. Cut into lengths of three centimeters or so.

Bring a pot of water to the boil. Increase the temperature of the oven to 200 * C. Drop the gnocchi into the boiling water a few at a time. Remove the gnocchi with a slotted spoon when they rise to the surface of the water. Place in a greased oven-proof dish and continue to cook the pasta pieces.

Top the gnocchi with the butter and brie (or other soft melting cheese). Bake in the oven for 15 -20 minutes, until the cheese is melted and golden. Sprinkle with a little extra parmesan. Enjoy!

Donna Hay Magazine, Issue 50.

Sunday, May 9, 2010

Whole oranges for afternoon tea...

Afternoon tea just demands a little mouthful of goodness, doesn't it? Something that is light but sweet, that slips down with a cup of something hot. That gives you a little energy to get through to your evening meal. But does not send you off into a siesta.

In keeping with these ideas, I turned a cake into cupcakes recently. And I don't think I'll be heading back to cake world with this one. Cupcakes it is. Easy to snaffle down. Less mess than a whole cake. Very transportable, to work for afternoon tea say...

This recipe has come together from a variety of sources. It is intended to be a quick, whip up sort of cake. But no matter how much you process whole oranges I have found it still get chunks of peel. And peel puts people off. So I followed the Jewish/gluten free ideas of boiling your oranges first until sumptuous and soft. Until the whole house smells clean with citrus scent. This does extend the cooking process by a few hours. But it effectively uses up some sorry fruit you may have lying around. And I often boil the fruit the night before and leave them sitting in their water until I'm ready to cook. Or boil up a few oranges, stash them in the freezer and simply defrost whenever the need for cupcakes arises. Hurrah!

Whole Orange and Raspberry Cupcakes
Makes 28 or so

2 whole oranges
1 3/4 c plain flour
3 tsp baking powder
1 c sugar
3 eggs
150 g butter
3/4 c raspberries (frozen is fine)

A good few hours before you want to eat your cupcakes, place the oranges whole into a saucepan of water. Ensure the oranges can be fully submerged. Cover and bring to a gentle boil. Simmer for an hour or so, until soft but still holding their shape. Cool.

Pre-heat oven to 170* C. Place cupcake papers into an average sized cupcake/muffin tray.

In a food processor, blitz the oranges until they are smoosh. Add the flour, baking powder, sugar and eggs. Pulse until combine. Melt the butter and then add it to the batter with the motor running. Turn off the processor and fold in the raspberries.

Spoon mixture into the cupcake papers, until 3/4 full. Bake in your oven for around 15-18 minutes, until golden and lovely looking. Cooked through helps too. Leave to cool in the tray for 5 minutes before turning out onto a wire rack to cool completely. Repeat the baking process until all the mixture is transformed into cupcakes.

Serve dusted with icing sugar, or with a touch of cream along side. Or simply as they are.


Saturday, May 8, 2010

Inspired to be a better cook...

Meat, glorious meat. So far most of the carnivore recipes that I've posted have been pork. Strange. It is not as though we eat only pork, or that we have it all that often. But when cooked with some consideration, it sure is good. Something about the sweet flesh and salty fat. Oh, tasty.

As I've been watching more than my fair share of MasterChef, I've been encouraged to consider cooking a little more than usual at the moment. The question the judges on the show often ask is, "how does it look on the plate?" While I've not gotten too fussed about this question, I have tried to experiment with techniques and tastes. Such as rhubarb and pork. Such as pounding up some herbs, rubbing them over meat before making a passel by wrapping in bacon. And this worked. It looked interesting, it had depth and variety of flavour. Plus it didn't take too long to make, perfect for a fancy meal mid-week.

Pork passels with rhubarb.
Serves 2

Handful of herbs - I used garlic chives as they are growing in the garden
1 clove garlic
2 tbs olive oil
2 pork loin chops
salt and pepper to taste
2 rashes middle bacon, thinly sliced
two handfuls diced rhubarb

In a mortar and pestle, combine the herbs and garlic, pounding to form a smooth paste. Add the olive oil to loosen the mix. Season with a little salt and a good grind of pepper. Rub over your pork chops and leave to marinate for around an hour.

Pre-heat oven to 220* C. Wrap a rash of bacon around each pork chop. Heat a frying pan over low heat with a little extra oil. Gently fry the bacon-wrapped chops until they get a little colour. This is simply to start the cooking process and ensure your bacon is not too pastey.

Line a roasting tray with baking paper. Heap the rhubarb in the centre of the tray and place the pork passels on top. Wet a piece of baking paper and scrunch it up. Open out and place over the top of the pork. Bake in the oven for 15 minutes. Remove the paper and bake for a further 15 minutes.

Remove from the oven and rest for 5 minutes before serving. Serve with super fresh veggies. Enjoy!

Adapted from Jamie Oliver's Happy Days with the Naked Chef.

Wednesday, April 21, 2010

Crackers for crackers...


Some times you just need a snack, a little bit of something to see you though. Right? But what if your fridge has only a scrap of cheese? Or if your bread is stale? Or if there is no fruit? Or if someone bought the wrong crackers from the shops on their last shopping adventure? What do you do?

Given that we love a pre-dinner snack, with a drink too, I've come up with these babies. Home made crackers. Am I crackers? Cause they are cheap to buy from the supermarket and come in so many varieties. Recently I found some fig and seed crackers, that's how diverse the range is. So why make them? Cause they come together in a pinch, and are out of the oven after 10 minutes. Cause they are great to whip up when someone unexpected arrives. Cause they are great warm with cheese. But also great a few days old with dip. And indeed they do keep in a biscuit tin for at least a week, if you can stop eating them that is.

That's why I'm crackers for these crackers. And the fella is too.

Home Made Crackers.
Makes a tray full - maybe 24 or so

1 c plain flour, sifted
1/2 tsp baking powder
30 g butter, softened
up to a tbs flavours of your choice - dried herbs, salt and pepper, sesame seeds, etc!
chilled water
small amount of milk

Pre-heat oven to 180* C. Line a baking tray with paper.

In a bowl, combine the flour and baking powder. Add the butter, mixing it in until the butter is combined with the flour. I recommend using your finger tips. When combine, you will have no lumps, rather more textured flour than you started off with. Add the flavourings.

Slowly add a little cold water, until the mixure comes together into a soft dough. Don't add too much water, as you don't want a sticky mess. Once combine, kneed briefly to form a smooth dough. Roll mixture out onto a floured surface, until a few millimetres thick. Cut into shapes as you please - uniform squares, rough bits, anything really. Place crackers onto prepared tray. Using a pastry brush, lightly brush the crackers with milk. This will help them to brown. If you want, sprinkle some salt on the top.

Bake in oven for around 8 minutes, giving a few minutes more as needed. Cool on a wire rack before devouring with your chosen additions - cheese, dip, pate, olives, etc, etc.

Inspired by a few recipes, including one from Joy the Baker and also the Preserve It cookbook

The fella whipping up some savoury crackery goodness.

Daiquiri ice cream if you please...


One of my principles of make-it-yourself extends to ice cream. The flavours simply can't be compared to what comes out of a tub from the super-chilled isle of the supermarket. Think of home made ice cream more as a trip to Trampoline or your local little ice creamery, where things are churned by hand, made with love and the staff will occasionally break into song when Michael Jackson is played over the speakers.

But what if you don't have the goods? Cause to make good ice cream, you really do need a makers. Once of those frozen bowls that has a mixer inbuilt. That makes your ice cream smooth and soft and cold. So what do you do?

Try this recipe silly! No churn ice cream. Still luscious and creamy. No chunks of icy shards. Just smoothness. I think the alcohol stops this from getting to hard. And the cream whipped helps too. I'm planning on experimenting to find out what freezes and what keeps your mixture smooth. But until then, daiquiri ice cream if you please.

Daiquiri Ice Cream
Serves 6

1/2 c lemon juice
2 tbs white rum
3 tbs cointreau
3/4 c icing sugar
600 ml cream

Combine together the lemon juice, white rum, cointreau and icing sugar until sugar is dissolved. In your mixer, add the cream to the lemony, groggy, sugary goodness and whisk until firm peaks form. Spoon into a container for freezing, cover and place in your freezer overnight.

Adapted from Nigella Lawson's Nigella Express.

Duck for dinner...

I embarked on a cooking challenge recently. A little beyond my previous level of experience. Something I'd been wanting to make for a while. A duck. Yep, that's right, roasting a duck. The fella loves duck you see. Given the chance it is what he will order when out and about. Particularly if we find ourselves in China Town. Crispy skinned duck, cooked for hours, hanging in a shop window. When you order, language is a barrier so simply pointing and making enthusiastic noises gets you what you want.

As for me and my duck...

Well it sat in the freezer for some time while I read recipes and compared processes. Did it really need to be cooked for hours? After all, isn't it really just a chicken? And if a chicken was roasted for three hours it would be as dry as a bone. And all that fat that the recipes keep talking about. Surely there can't be that much fat ensuring I need to drain it every half an hour? To stuff or not to stuff? Sauce along with or along side? Vegetables?

Well, this wasn't going to be a post about duck. It was to be about ice cream. But I'll save dessert for later. In the end I chose to go with Jamie. I find that his recipes work. Certainly his meat ones anyhow. And he doesn't mind trying interesting flavours also. Plus the particular recipe of his I stumbled across stipulated rhubarb. One of my favourite ingredients. I had to make it. And it was moreish. With gravy. And potatoes basted with duck fat... very lip smackingly good.

Try it if you will. But I do have to apologise for the pictures. The duck came out of the oven, and before it could be neatly presented was snapped up. So odd looking awkward bird, you were tasty, really you were.

Roast Duck with Rhubarb and Garlic Gravy
Serves 3 (or 4 at a pinch).

1 whole duck, around 1.8 kg
Salt and pepper
1 stalk rhubarb, diced
Half a head of garlic, peeled and cloves cut into thirds
1 onion, thinly sliced
Handful basil, torn
1/3 c red wine
2/3 c vegetable stock

Pre-heat oven to 180* C.

Prepare you duck by washing it and removing any juice from it. Pat dry and season the skin and cavity well with salt and pepper. Combine the rhubarb, garlic, onion and basil in a bowl. Stuff it inside the duck's cavity, then close the duck up modestly.

Place the duck on a rack, place the rack into an oven tray and bake for an hour. Drain the fat off half way through, and make sure you have lots of fans going in your home. Or else the smoke detectors are likely to be set off. So much fat comes out of this bird. So much!

After an hour, reduced the oven's temperature to 150* C. Cook for a further hour and a half, until the drumsticks pull off easily. You may not need this long, you may need longer. Remove the duck from the oven, scoop out the stuffing, cover the duck and let it rest.

Place the stuffing in the oven tray. Put the tray onto the stove top and heat over a medium heat. Scrape off the sticky bits on the tray, smooshing up the rhubarb and garlic as needed. Add the wine and stock, bring to the boil. Reduce the heat and simmer gently for around 10 minutes. Strain the gravy through a sieve into your gravy boat.

Carve up the duck, or just hack into it as I did. Serve with gravy poured over and also some roasted potatoes what were lovingly brushed in duck fat while they cooked in the oven. Some peas are tasty too.

Adapted from Jamie Oliver's Happy Days with the Naked Chef.

Wednesday, April 14, 2010

Takeaway alternatives...

"Can we please have pizza for tea?" we both silently cried.

After all, we were going out for drinks after work. To our little local bar the Banff. It sells a good amount of pizzas with simply, delicious toppings. And has happy hour. With cheap, cheap drinks. A variety of reds, with a local brew on tap. And tonight would be beer night. A jug if you please. The plan was to sit outside, sip away at our drinks and discuss the important things in life. Needs to be done at least once per week I would think.

So should we give in and get pizza with our drinks? Should we eat out for the nth time this week? Oh, the smell of olives and peperoni... The squid and chili topped pizza... The special of the week being mushrooms and mozzarella... How did we resist?

By looking forward to a quick-fix, super tasty eggplant pasta. But the vego/eggplant rule of our house has to pervade - cheese must be included for it to be a meal that satisfies the fella.

Tempted not to cook? Thinking of dialing for a pizza? Or perhaps strolling across the park to your local for a quick bite to eat? Make this instead. Then snuggle down in front of the telly with a cool drink and watch some trash (e.g. Make Me a Supermodel).

Eggplant and Tomato Pasta
Serves 3 - 4.

Splash of olive oil
1 large eggplant, diced into 1 cm cubes
1 onion, finely diced
2 cloves garlic, smooshed and diced
400 g tin diced tomatoes
2 tbs balsamic vinegar
good pinch of salt and grind of pepper
bag spinach leaves
good amount of cheese, such as danish feta
200 g dried pasta of your choice

Heat oil in a large frying pan over medium heat. Add the eggplant and give it a good stir. Cook for around 8 minutes, until the eggplant is starting to soften. Add the onion and garlic, cook until they begin to brown a little. Add the tomatoes, vinegar and seasoning, reduce the heat and simmer for around 15-20 minutes. The sauce will thicken and flavours will intensify.

Meanwhile bring a large pot of water to the boil, add the pasta and cook for the recommended time. Once cooked perfectly, drain and set aside.

Just before combining the sauce and the pasta, tip in the packet of spinach leaves and crumble through the cheese. Serve warm, with optional chili if you so wish. Any thoughts of pizza will be banished for the evening.

Adapted from Jamie Oliver's Jamie's Dinners.

The Banff bar

Old and faithful crumble cake...

I had a simply lovely baking day recently. We had gone to the markets, so there was plenty of fresh produce around. We had large fresh free-range eggs in abundance. There was so much autumnal fruit, with the last of the plums and plenty of pears. Simply delicious. I purchased a good amount of pears, raided the pantry and got cooking.

I whipped up the last post, some breakfast bars. And these have been getting us through the week. But some old and faithfuls were baked too. Banana bread, studded with walnuts, deliciously dark with cocoa. Baked in the oven until crisp on top and fluffy in the middle. What a great stand-by recipe. It is what I make when I simply have to cook but don't feel adventurous. The other reliable baked delicious thing that was made was a crumble cake.

Crumble cakes are versatile. Any fruit can be used. And the toppings can be changed depending on what is at hand. This weekend I was clean out of coconut after making the breakfast bars. So I simply added more oats and more brown sugar. As for the fruit, some rhubarb from the freezer was added to those firm and volumptuous pears.

Pear and Rhubarb Crumble Cake
Serves 12 or so

4 eggs

200 g sugar
200 g butter, melted
1 2/3 c plain flour
3 tsp baking powder
1 pear, cored and diced
handful of rhubarb, diced
crumble topping for cake
50 g butter
200 g dry ingredients - be sure to include brown sugar and flour, oats, coconut, seeds or nuts work also.
2 tsp cinnamon powder

Pre-heat oven to 170 * C. Line a large round baking tin with paper, or grease and flour to ensure the cake can be removed from the tin once cooked.

Cream together the eggs and sugar in your electric mixer until light and fluffy. Add the melted butter, mixing to combine. Fold in the sifted flour and baking powder, or simply use self-raising flour and omit the rising agent. Pour into prepared cake tin. Sprinkle the fruit over the cake mixture. Any fruit can be used really. Try two apples, peeled, cored and diced. Or some pears and sultanas. Or some frozen berries. Or diced appricots. What ever you have and love.

Make the crumble topping by combining the dry ingredients and cinnamon with the butter, rubbing the butter in with your finger tips until you have soft lumps with no real wet bits of butter. Crumble this topping over the cake.

Bake in oven for around 45 minutes. This will depend on your oven and the size of your cake pan. Cover with foil after 30 minutes if the cake is browning too quickly. Test cake is cooked by inserting a squewer into the middle. If it comes out with wet cake mix on it, return to oven to cook further.

Cook on a wire rack in tin for 10 minutes before removing from tin and leaving to cool completely.

Mum's recipe originally, which I'm sure she got from somewhere. Now my own.

Saturday, April 10, 2010

Breakie on the run...

We are often running late in our house, particularly in the mornings. The alarm goes off and the snooze button is pressed half a dozen times. Some one gets motivated the get up then the other person rolls over and squashes any plans for getting out of bed. So we run late. We've tried the alarm on the other side of the room. We've tried putting catchy music on to dance to upon wakening. We've tried having the smells of coffee wafting from the kitchen to entice us in. The promise of bought breakfast even. Doesn't work. We sleep in. We run late.

In my latest efforts I've focused on compensating for being late. Why resist what cannot change? So I bring my toothbrush to work. My make up is done on the road. Toast slides off plates in the car when driving around corners. Or we go hungry until lunch.
So when I found a recipe for home-made breakfast bars it simply had to be made. Nutrition, on the go, sustaining tummies so they won't rumble during a morning meeting yet again. Sounds like a winner. Baked on the weekend in preparation for yet again hitting snooze.

Breakfast Bars
Makes 16 decent sized slices

1 tin sweetened condensed milk
35 g pepitas
75 g sunflower seeds
75 g walnuts, roughly chopped
125 g apricots, diced
125 g sultanas
50 g dessicated coconut
250 g oats
2 tbs cinnamon sugar

Pre-heat oven to 130* C. Line a lamington tin with paper, or any other shallow dish with a large surface area.

Gently heat the milk over a low heat in a large saucepan. Combine the remaining ingredients (except cinnamon sugar) and gently stir them into the hot milk until all is combine. There should be no dry bits anywhere.

Spread into the prepare tin, pushing into the corners. Sprinkle cinnamon sugar over before baking in the oven for around 50 minutes.

Once cooked and delicious, remove from oven and slice into 16 pieces. Then leave to cool before storing in an air-tight container. Delicious with a cup of hot coffee for people on the go.

Adapted from Nigella Express by Nigella Lawson

If only I had time for that cup of tea too.

Building family traditions...

Easter has come and gone, so perhaps it is too late to put some seasonal treats up. Between Easter and today we have gone through quite a few ups and downs, one of them being that this bad boy computer needed a visit to the repair man. But the comp is back in action, and the cooking continues. After all, just this past week a relative reported that we are "still in octave of Easter."

As for Easter, I made a number of treated that I really enjoyed, and a few that flopped and hopefully will not grace the Easter table again. Two old favourites were whipped up - the Maundy Thursday fish pie and the eastern European Easter bread. We had the pie with friends, and yet again forgot to watch the Passion of the Christ. Having friends over is a new bit of the tradition, forgetting to watch this chilling film is usual fare. Each year a I make the pie with differing fish, add a few prawn and take hours cooking it, which mean we don't eat until very late. But it is important to build memories, and I believe that memories are aided by tradition.

As for the Easter bread, oh, so good! It is truly rewarding to make. The yeast simply rises and rises the leaven loaf. It is speckled with sultanas and glistens under an egg wash coat. Plus coloured hard-boiled eggs are wedged into the folds of the bread's plat. Eat it hot on the Easter holidays, toast it in the week following for breakfast. Delicious. And traditional also. My mother-in-law requests this yearly. It reminds her for food she ate in Finland as a child. So I always bring it to Easter Sunday lunch. After getting up at 0600 hrs to prepare it. So I wake early, put the coffee pot on the stove and get baking. This year with the aid of my ruby-red KitchenAid this bread was a breeze.

I hope you enjoyed some seasonal baking, and have fun building traditions with those who are important to you.

Eastern European Easter Bread a.k.a Kuliza
Makes one very large loaf or a number of smaller ones.

14 g dried yeast
50 g warm water
1/3 c sugar
3 1/2 c flour
1 tsp ground cinnamon
1 tsp dried ginger
1 c sultanas
zest of a lemon
150 ml milk
60 g butter
4 eggs
Up to 100 mg water, extra


Place yeast, water and 1 tbs sugar in a bowl. Stir to combine and then set aside to bubble and froth and get your leavening process started.

Combine flour, spices, sultanas and zest in the bowl of your mixer. Combine the milk and butter in a bowl. Heat gently in the microwave for 30 seconds to soften the butter and warm the milk. Stir this along with the yeast mix, 3 eggs lightly beaten and a little of the water into the flour mixture. Using a dough hook, kneed in the mixer until dough is smooth and lovely. Add more water if you need, but don't make the dough too sticky. Alternative mix by hand and kneed for a good while to form a similarly smooth dough.

Remove to a greased bowl, cover and leave to prove for an hour or so until doubled in size. Punch down the dough, divide it into three pieces and roll these pieces out. Make them long and of an equal length, before platting together and placing onto a lined tray. Or you could make a few little loaves in a similar fashion. Cover with a tea towel and leave to prove again for around an hour.

Make the coloured eggs during this hour and also pre-heat the oven to 190* C.

Place the eggs along the centre of the dough, brush with the remaining egg before baking in the oven for 25 minutes for a large loaf and 15 minutes for the small loaves.

Serve warm with butter.

Coloured Eggs

4 eggs
1 tsp red food colouring
water to cover the eggs

Place the eggs into a small saucepan. Cover with water and pour over the food colouring. Bring to the boil before simmering for 10 minutes. Remove from heat and leave to cool in the coloured water for 30 minutes to set the colour. Remove from water and allow to dry.

Originally from a Delicious magazine, now just from my adaptations.

Tuesday, March 30, 2010

Easter gifts...

Are people moving away from bought chocolate eggs? Whenever I go to the supermarket, I doubt it. There are rows and rows of foil-wrapped, perfectly formed delicious goodness. But they are all the same, can be snaffled down in a matter of minutes and can lack a personal touch. Plus my sister-in-law has inspired me as she wants to give fair-trade eggs and is on the hunt for the perfectly sized ones.


Now the fella and I don't feel compelled to give each other eggs. We would be okay with a hot cross bun instead, or a block of chocolate even... And with my girlfriends we tend to make things for each other. Last year being so far away I made an enormity of fabric "eggs" (really misshapen balls), took a photo and sent it off. As for this year...


The first thing I've had the energy to create has been these Easter cup-cakes. Why they are associated with Easter, I'm not sure to be honest. They came from a Coles catalogue a few years ago labeled as "Easter Mud Muffins". I have changed them a little, make them as cakes and think they look swell with a little Easter decoration. If you are going to call a baked good "Easter ---" it should at least have some connection through decoration, don't you think? So when a girlfriend came to tea, she left with a few of these. And the fella keeps sneaking them out of the fridge. The container this morning had only five left! There were originally 17, with some given away also... but only five left!

My next Easter baking adventure I hope will be an Easter nest cake. I've then got Russian Easter bread to make for a family gathering. The kitchen, here I come.

Easter Cup Cakes
Makes 16 or so

100g butter
100 g chocolate, broken up
1/2 c sugar
1/2 c milk
2 eggs, lightly beaten
1 1/2 c plain flour
3 tbs baking powder
2 tbs cocoa powder
3/4 c apricots, diced
1/2 c walnuts, roughly chopped

Pre-heat oven to 160* C. Line a 1/2 c cupcake/muffin tray with papers.

Combine butter, chocolate and sugar in a saucepan. Melt over a low-medium heat. Remove from heat.

Stir in the milk, followed by the eggs once the mixture is not boiling hot. Sift in the flour, baking powder and cocoa, stirring to combine. Fold in the apricots and walnuts. Spoon mixture into the prepared tin, filling to 3/4 full or so.

Bake in the oven for around 18-25 minutes, checking after 18 to see if they are cooked. Rotate the tray if you want to also. Remove and cool for around 5 minutes before turning cupcakes onto a rack to cool completely.

Butter Icing
Makes enough to generously ice these cupcakes

3/4 c butter
2 c icing sugar
2 tbs cocoa

In your mixer, beat the butter until very light and white in colour. This will take at least 5 minutes. Add the icing sugar and beat for a further 5 minutes until the icing is very light and fluffy and smooth. Add the cocoa, mix until combined throughout.

Spread mixture generously over the tops of the cakes. Decorate with an Easter egg or similar if you want to.


Wednesday, March 24, 2010

Who am I - flavours with a twist...

What are they?

They are versatile and are a perfectly legitimate excuse to eat cake for breakfast.

They freeze well.

They don't mind being warmed in the microwave.

They can be made with just about everything or anything in the cupboard.

They work well with coffee.

Muffins! So tasty! So easy to prepare. So readily transformed by whatever ingredients take your fancy. Like today. I had some sour cream in the fridge that needed to be used. There were also some stalks of rhubarb floating around. And surely there was some chocolate tucked away somewhere. Twenty minutes later I had made a delectable snack that would feed us both for the next few days. And what a combination. Bitter depth of dark chocolate, tang of the rhubarb. And the combination of colours won me over too - pink and brown, so irresistible. I must confess, I've eaten more than my fair share today...

Rhubarb and Chocolate Muffins

Makes 12

1 3/4 c plain flour
1 1/2 tsp baking powder
1 c sugar
1 stalk rhubarb, diced finely
3/4 c chocolate, in bits
30 g butter, softened
1 c sour cream
2 eggs

Pre-heat oven to 180* C. Line a muffin tray with paper cases.

Sift the flour and baking powder into a large bowl. Stir in the sugar and mix to combine. Stir in the rhubarb and chocolate.

In a separate bowl combine the butter, sour cream and eggs. Mix this mixture into the dry ingredients, stirring minimally to combine. Scoop generously into the muffin trays, close to full really.

Bake in the oven for around 15 minutes, checking and turning in the oven after 8 minutes. Remove from oven, leave to cool slightly in their tray for 5 minutes before turning onto a rack to cool.

Eat within 2 days, or else store muffins in the freezer for a rainy day.

Inspired by a recipe from the Trinity Church Cookbook.

Tuesday, March 23, 2010

Hotties for Easter...

Seasonal baking, great in theory but challenging to implement in practice. Whenever Christmas comes around I'm too exhausted from the year to prepare those puddings in advance, to make the fruit mince and then the pies, to roll and cut out Christmas tree cookie decorations, to lovingly prepare jars of jam as gifts. I always want to, but struggle in the end. Similarly with Valentine's Day or St Patrick's. Not that Aussies are really in to these "holidays".

But with Easter I try to make the effort. We have traditions for Thursday night, with fish pie and the Passion of the Christ dvd. I get home and poach fish in stock, layer it in a dish, make a milky sauce, boil potatoes and place the lucious pie into the oven. By this time it is almost 9 p.m. and who is keen on eating anyway. But the pie and any leftover peas get us through the weekend, between visits to families where we are stuffed full of lamb.

And the best culinary delight of Easter? Has to be the hottie. Yum oh! How I love hot cross buns. Light morsels, speckled with fruit, flavoured with spices, that white cross on the top which is beging to be picked off and eaten first. This is one thing I make yearly, and indeed weekly in the month leading up to Easter. Just whipping up our second batch for the season now.

Hot Cross Buns
Makes up to 20 or so

1/4 c water
4 tsp dried yeast
2 tbs sugar
4 c flour
1/2 c sugar
3 tsp spices
At least 1 c dried fruit
2 eggs, lightly beaten
3/4 c milk
1/4 c butter
1/4 c flour, extra
2 tsp sugar, extra
more water
1/4 c sugar, again extra
1/8 c water, heated

Combine 1/4 c water, yeast and 2 tbs sugar in a bowl. Whisk to combine and set aside for around 10 minutes to get started. This kicks the yeast process along, but is not entirely necessary. Feel free to simply tip the yeast (forget the water and sugar) in with the flour at the next step.

Combine flour, 1/2 c sugar, spices and dried fruit in a bowl. The spices should be ground if dried. They can include any flavours you like. Most recently I've been using cinnamon, dried ginger and the zest of an orange. Cardamom or nutmeg is also nice. With the dried fruit, chop it up finely and use tasty combinations. Nothing beats currents and sultanas, but dried apricots, pears and figs are great too.

Add the yeasty mix, the eggs along with the milk and butter. But first combine the milk and butter in a microwave safe container and heat gently for 30 seconds. This will soften your butter and again help with the yeast process of things being warm and at the optimal temperature to rise! Kneed until the dough is soft and elastic, either on the bench by hand or in a mixer with a dough hook (I use the mixer).

Lightly grease a bowl, place dough in it, cover and leave in a warm spot to prove for around an hour. The mixture will double in size.

Punch down the dough, divide the mixture in half and then form from this into small balls of around 7 cm diameter. This is not absolutely required, but easy to achieve if you keep on dividing the dough in half until you have nice little bun-sized balls. Place on a lined baking tray, cover and leave to prove for a further 30-40 minutes. Turn on the oven at this time to 180* C.

Mix together the extra flour, sugar and water to form a paste. Using a piping bag or some other device, use this paste to form crosses on top of the buns. Bake in the oven for around 15 minutes, until golden and cooked through. Meanwhile combine the sugar and hot water. When the buns come out of the over, brush this sugary glaze over the top of the buns. Leave to cook somewhat before tearing appart, smothering with butter and eating with greedy passion.

Recipe adapted from too many sources, now just my own.

Christ is Risen!

Thursday, March 18, 2010

Market treats and pasta for tea...


The markets were turning to autumn this week. Less stone fruit, and what is left has some wear and tear. Beautiful plums though, those late bloomers. And lots of delicious pears. Plus apples coming in. An a pomegranate or two. Yum oh! And the last of the tomatoes. I was thinking about buying a bucket load and making relish. Will have to wait until another day I'm afraid though. What I did pick up was a kilo of olives. My ideas a rolling as I dream of what to do with them. They will need to be rested in brine for a good while before I do any further taste creating, but oh well.

When I got home, all the ingredients were put into the fridge and other things were created. Time for hot cross buns, or those without the crosses known has hot tasty buns. Some pasta all' amatriciana for lunches tomorrow. Two oranges on the boil to later on pulp and make into a cake. Fancy some pasta lunches too?

Pasta All' Amatriciana
Serves 4

good splash of olive oil
1 onion, finely sliced
6 rashes bacon or 150 g pancetta, diced
1 tsp paprika - smokey and hot is best
1/2 c white wine or chicken stock
400 g tin diced tomatoes
1/2 c water
1 tbs dried chilli or 1 fresh chilli
300 g pasta - fusilli is best, but use what you have (e.g spagetti)
cheese to serve

Heat the oil in a wide, deep saucepan over medium heat. Add the onion, stir and cook for 5 minutes until softened. Add the meat and paprika, stir again and cook for 2 minutes. Add the wine or stock, simmer for a few minutes until reduced.

Add the tomatoes, water and chilli. Season to taste. Simmer for at least 15 minutes, until thickened.

Mean while, cook the pasta according to packet instructions.

Toss pasta together with the sauce mix. Serve topped with cheese and salt as needed.

Adapted from Australian Table Magazine, August 2007.

Wednesday, March 10, 2010

A bush holiday breakfast...


We had a simply lovely, delayed Labour Day long weekend away. Yep, went to the country on Monday night, came home mid-Wednesday. It meant we missed the traffic, and the house belonging to friends was available for a retreat. How lovely to do lots of holiday things - sleeping in, a snuggley doona to burrow under, sitting by the fire reading and knitting, playing our new board game until the cows come home, seeing rabbits bound around the yard, dreaming of having my own holiday house in the country one day...

And baking.

With yeast.

On holidays.

Surely this is too much work, you are thinking. Normally I would agree to. But I wasn't the one doing the baking. I was the one doing the eating. Yum. That's right. The fella baked. Firstly, he made a walnut-speckled round of bread. Great with blue cheese. Then while I was napping, he whipped up a batch of biscuits - with more of those walnuts, along with chunks of white and milk chocolate (I'm planning on giving this recipe a test as it was a bit of a winner). Then he made pizza dough.

By this stage we were both exhausted and fell asleep (that's me going to sleep again after a long nap). So no pizza was had. Which left us with options for breakfast. In our house, holidays normally mean bacon and eggs but with left over pizza dough what were we to do?

Breakfast calzone anyone?
Breakfast Calzones
Serves 4 generously

Pizza dough
2 tsp dried yeast
1 tsp sugar
4 tbs warm water
2 c plain flour
1 egg
2 1/2 tbs milk
1 tsp salt

Calzone
4 tbs tomato paste
1 tomato
4 rashes short bacon
4 eggs
8 balls bambini boconccini

To make the dough, combine yeast, sugar and water in a bowl. Whisk to combine and set aside for a little while to get the yeast kick started. The mixture should froth and form a funky looking top. Sift the flour into a bowl or onto the bench (if you are feeling al naturale), make a well in the centre. Add the remaining dough ingredients, along with the yeasty mix. Slowly bring in the sides until combine. Turn out and kneed for a good 10 minutes (or simply undertake this entire process in your mixer for very little effort and reduced time).

Oil a bowl, place the dough in it and turn to grease the dough. Cover and leave to prove in a warm place for an hour, until large and risen and fluffy. Pound down, gently kneed and leave to prove again for a further thirty minutes or so. If you are doing this the night before, place into the fridge to prove overnight.

Pre
-heat the oven to 180* C. Line two baking trays with paper.

Divide dough into quarters. Roll out gently to form ovals. Place the ovals onto the trays. Cover half of each oval with a tablespoon of tomato paste. Dice tomato and combine with diced bacon. Sprinkle this mix over the tomato paste on each of the ovals, trying to make a wall around the edges. Crack an egg into the centre of each calzone - hence the need for the bacon and tomato wall. Break up the boconccini and scatter over the top, season with a good grind of pepper. Fold the ingredient-free half over the filled half, pressing the edges to seal. If you have a leak of egg, brush this over the top of the sealed calzones.

Bake in the oven for around fifteen minutes, until golden and cooked through. Leave to cool on trays for around five minutes, before enjoying with some Tabasco or relish.

Dough recipe from Marie Claire Kitchen.