Sunday, November 29, 2009

Raspberry cake for morning tea...

When something is made twice in one week, it must be good. And this cake certainly is. Why I've not made it before now, I'm really not sure. There are only good things about it - lots of butter and sugar, zing from some raspberries, light texture, made in a decorative tin.

I was needing to fill in for morning tea at work. As the designer of the roster, it is my responsibility to ensure that everyone on my team contributes equally to our food intake. And when someone left the team recently, it seemed easier to me to make a cake than change the roster. The cake needed to be done with minimal fuss, and without too much glam. After, it was not really my turn at providing the food. This was the perfect thing to prepare, simple yet delicious, elegant without showing off too much.

Please enjoy with a cup of tea.

Raspberry Cake

Serves up to 10.

250 g butter, softened

1 ½ c sugar

1 tsp vanilla essence

4 eggs

2 ½ c plain flour

2 ½ tsp baking powder

1 c milk

2 c frozen raspberries

Spray oil, or similar for greasing your cake tin

Pre-heat your oven to 160 ◦C. Grease a fluted tin with a spray of oil – I have a silicone one that works wonders for this cake.

Beat the butter, sugar and vanilla together in your electric mixer for five minutes, until light and fluffy. Add the eggs, one at a time beating well between each one. Turn off the mixer, sift in the flour and baking powder and beat together on a low speed. Slowly add the milk with the mixer beating, until well incorporated. Turn off the mixer, fold in the raspberries.

Justify Full

Spoon the mixture into the prepared tin. Bake in the oven for around one hour and fifteen minutes until cooked. It may take more or less time, so start checking after an hour of cooking.

Cook for five minutes in the tin before turning onto a wire rack to cool. Delicious with some cream, with some homemade ice cream, or just as it is dusted with icing sugar.


Donna Hay magazine, Issue 17.

Friday, November 20, 2009

Strawberry Sponge Deliciousness...

Mmmmmm, ice cream. The bug has surely bitten, and it won't let go. How did I ever consume the version purchased from a store in a carton? How could I have once declared it to be my most favourite thing to eat, ever? Obviously this was before I seriously got into home made ice cream. And I think the fella is won over too. Tonight he turned up his nose at ice cream on the wharf for the variety we had setting in the freezer - burnt caramel with a fig jam swirl. Can't say I blame him, and indeed partook in some of this deliciousness too. The jam was an addition to the butterscotch/caramel we make often. But this time I was having so much trouble getting the butter to brown rather than burn. But that is a post for another day.


Back to the jam. Ice cream making fits in with my desire to be industrious and self sufficient. It is a very therapeutic thing to create, with stirring, patience and a few days before having a finished produce. This is not particularly dissimilar from making preserves. If I find fruit on sale, I will buy a few kilos and make jam. Apricots are hard to pass by, strawberries when they are in season, figs when they are in abundance on a friendly neighbour's tree... Generally the results are amazing. But with strawberries I often end up with a luscious sauce with a few chunks. The lack of pectin in strawberries is a real challenge when jam making, but perfect with topping off a cake-flavoured ice cream.


I found this recipe's inspiration on a fantastically bespoke blog called The Kitchy Kitchen. It called for cake mix in with cream and ice cream. And boy does it work. But rather than ending up with a cake flavour generally, I took inspiration from the humble sponge and swirled through some runny strawberry jam. It adds a different texture to the mix, it imparts a hint of tartness. Oh, how it works. Oh, how good the original recipe is also.

(Sorry about the terrible formatting!)

Strawberry Sponge Ice Cream
Makes c. 1 L


3/4 c cake mix
1/2 c sugar

1 1/2 c milk

2 c cream 3 egg yolks

2 tsp vanilla
pinch salt
1/2 c strawberry jam

Sift cake mix into a medium saucepan. Add sugar, 1 c milk and 1 1/2 c cream. Stir over medium heat to combine.


Meanwhile, beat the yolks in your mixer. Slowly add 1/8 c amounts of the hot cake mixture, stirring throughout. Add around half the cake mix to the eggs. Transfer this egg-cake mix back into the saucepan with the remaining cake mixture. Add vanilla and salt. Cook over medium heat until thickened, stirring continuously. Remove from heat, stir in remaining milk and cream. Transfer to a bowl, cover the surface of the ice-cream mixture with glad wrap. Set aside to cool before refrigerating overnight.


Churn in your ice cream maker, for around 20 minutes until the ice cream is smooth, chilled and thickened. Stir in the jam, transfer to a freezer container and freeze overnight.
Adapted from the Kitchy Kitchen blog.

Wednesday, November 18, 2009

Honey and Spice and All Things Nice


(Firstly, sorry for the dodgy photo. We ate all of this ice cream before a good picie could be taken).

Strange things are afoot in our place. We make bread. We don't own glad wrap. We are thinking of selling our car and riding everywhere. We have started smoking occasionally (and I really do know how bad this is for my health). We don't buy ice cream, it has to be home made to be consumed. Strange.

But home made ice cream is surely a treat. The texture is smooth. The flavour possibilities are only limited by your imagination. So far we have largely stuck to a butterscotch/caramel and also a rich chocolate. But inspiration has hit, the need to clear out the cupboards of perishable has ment discovering new options for ice cream flavours. My fella insists that the butterscotch/caramel cannot be beaten, but I am trying that's for sure. Am I on to a winner with this one? I think so, but he is yet to be convinced. Perhaps next time I will win him over.


I have a few tips for making ice cream. They are simple but necessary. Too often I've ended up with expensive custard. Too often the ice cream churner has been religated to the appliance cupboard. After trial and error the churner now lives in the freezer, ready to make ice cream at short notice. So here is what to do:


1. Have your churner frozen for at least 24 hours before you churn;

2. Make sure your ice cream has a thickening agent - eggs or cornflour - otherwise it is challenging to get it to set and you get crunchy ice cream;

3. Cool your ice cream mix overnight before churning it, make it cold!


Honey & Spices Ice Cream

Makes around 800 mls


200 mls thickened cream

500 mls milk, plus 50 mls more

4 cloves

½ tsp ground cinnamon or ½ cinnamon stick

½ tsp ground cardamom or three cracked cardamom pods

150 ml honey

2 tbs corn flour


Place the bowl of your ice cream maker into the freezer.


Combine the cream, milk and spices together in a medium saucepan. Heat gently until steaming. Remove from the heat and leave to infuse for around 10 minutes. Strain the milk through a sieve to remove the spices. Add the honey and stir well. Bring it gently to the boil, stirring often and simmer gently for around 5 minutes so that the flavours infuse well.


Pour the extra 50 mls milk in a small bowl. Add the corn flour and stir until smooth. Return this mixture to the main milky mix. Stir well, and simmer for a further 5 minutes. Stir it often as you don’t want burnt ice cream! The mixture will boil and hopefully thicken somewhat.


Remove from heat, pour into a bowl and cover the surface of the liquid with either grease proof paper of glad wrap. This will form a “skin” and prevent your ice cream from forming a thick top layer. Leave on the bench to cool to room temperature before transferring to the fridge to chill overnight.


Remove the covering from your ice cream mix, stir it well to ensure mixture is combined and pour into your ice cream maker. Churn for 20 minutes, until beginning to thicken. Transfer to a freezer container, seal and freeze until more firm.


Inspired by a recipe from Tessa Kiros’s Falling Cloudberries.

Monday, November 9, 2009

Fajitas frying the brain...

Has the heat turned our brains to mush? Or just inspired us to lounge underneath the fans? In this weather, most things are an effort. Simply moving around means that bits stick - to furniture, to clothes, to other bits or other people. And there is little end in sight. The build up is continuing, the rains remain unpredictable. There is no reliable break expected in the hot weather until mid- January. That is months away!

Until then, lots of cool drinks... at work is aircon is on minimum and I need a cardie... lots of swanning around with minimal clothing on... lots of salads, dips and no effort food.

Speaking of no effort food, what could be more simple than quick-cook fajitas? Jamie Oliver claims this to be a 19 minute recipe, from start to finish for a beginner. I knew I should have timed myself! It comes from Mr Oliver's book Jamie's Ministry of Food. Unfortunately this is my most least favourite of his publications - along with the pork documentary where artificial insemination occurred on stage/telly. The recipes just don't inspire me. They are far too simple. Pedestrian most certainly. Maybe they inspire cooking in the every day folk, but I think that the pizazz that was Master Chef did a better job.

Anyhow, after the whinging... This recipe is good. It is simple, it is tasty. It is easy to prepare. The other day the fella did the cutting and marinating while I went grocery shopping. A few hours later he warmed the tortillas while I cooked the meaty mix. So tasty, so easy to prepare. But enjoy these fajitas with mango salsa if you please...

Chicken Fajitas

Serves 2

2 chicken thigh fillets

1 onion

1 red capsicum

1 tsp smoked paprika

1 tbs chilli powder

1 tsp ground cumin

Good squeeze lime juice

Salt and pepper to taste

Dash vegetable oil

4 tortillas

Grated cheese

Sour cream


Optional:

Sliced lettuce

Diced tomato

Mango salsa

Guacamole

Etc!


Cut the chicken fillets into strips. Cut the onion as you wish – I like it sliced, the fella likes it very finely diced. Cut the capsicum into strips after discarding the core and seeds. Combine these ingredients in a bowl along with the spices, juice, salt and pepper. Cover and refrigerate to marinate the mixture. Give it five minutes of a few hours, whatever you have time for really.


Heat a frying pan over a high heat. Add the oil and warm it. Add the chicken mixture, but don’t overcrowd the pan. Cook for around five minutes, tossing to encourage even cooking. Remove to a plate and keep it warm. If you need to, repeat the cooking process with any remaining mixture.

Warm your tortillas – the microwave works well. Place a scoop of chicken mix onto the middle of the tortilla. Top with cheese and sour cream. Add any optional extras as you wish. Wrap up, eat while warm with a napkin handy for drips. May I suggest a cold beer with this too?


From Jamie Oliver’s Jamie’s Ministry of Food.

Saturday, November 7, 2009

Flatbreads, flat out

Have you ever gotten into baking bread? I mean, really worked at it, baked often, improved recipes, tried new techniques... When I was fifteen, I discovered focacia. And fell in love with it. I tried to follow pack mixes, I made loaves from scratch. I was hooked. So hooked, that when our kitchen was being renovated I needed to stop the builder from removing the oven from the wall as I had a focacia cooking inside. That could have been a tragic moment!


While I still enjoy a slice of focacia or two, I don't make it often now. Rather we bake bread for daily consumption. Stuff that can be sliced and placed into the toaster. Stuff that works as a sandwich. Stuff that is made for vegemite and butter.


But I still love a baking challenge. Not too long ago, I tried Martha Stewart's recipe for baguettes. This had some moderate success. I will also turn to How to be a Domestic Goddess when needing to create a yeasty produce. This recipe though, is from a faithful magazine. The Aussie success that is Delicious. I have no recollection of buying this particular magazine, although for a while I was receiving the second hand copies from my cooking sis Rach. I have used this particular issue often. It has been chewed by one of my hunry felines and chunks of the cover are missing. It contains the recipe inspiration for one of my favourite salads - rocket, boconccini, roasted capsicum and onions, olives, a citrus dressing! It has a pistachio and zucchini cake I long to bake. And it has these little babies.


These flatbreads are easy to prepare, perhaps a little fiddly to shape, but a rewarding bake. They are really not too much effort, and are far superior to the comercial versions from expensive delis. They only prove once, bake for less than 10 minutes and also keep for up to a week. The chilli flavour is subtle - add more if you are keen. But the subtleness makes these flatbreads versitile, ensuring they work work with most toppings.


Herb and Chilli Flatbreads

Makes 36 or so


1 tsp dried yeast

Pinch sugar

1 ¾ c. plain flour

2 tsp dried herbs – oregano, thyme, etc

2 red chillies, finely diced

½ tsp salt

Spray oil


In the bowl of your mixer, combine yeast, sugar ¼ c. flour and ¼ c. tepid water. Leave to sit and bubble for around 20 minutes. Meanwhile, sift the remaining flour into a bowl. Add the herbs and chilli. Stir to combine. Attached the dough hook to your mixer, add the flour mix to the bubbling yeast. Stir on a low speed to combine somewhat. Increase the mixer’s speed to medium, slowly add around ½ c. more of tepid water, adding a little at a time. When the mixture is coming together as a dough, stop adding water. Beat the dough for three minutes or so, until deliciously soft and smooth. Remove the dough to an oiled bowl, cover with a tea towel (or glad wrap if you use it), and leave in a warm spot to prove for an hour until doubled in size.


Ensure the oven is divided into thirds. Pre-heat the oven to 200C. Line three trays with baking paper.

Punch down on the dough to deflate it. Divide into two pieces, and roll into logs. Cut slices off the logs around 5 mm in diameter. Using a rolling pin, roll out the pieces into little ovals of dough. Place onto the lined trays, around 12 ovals per tray. Repeat, using up all of the dough. If desired, spray the ovals with oil. I often forget to do this – in the pictures, the pieces are not golden brown as a result of my forgetfulness. Bake in the oven for 8 minutes, until cooked and beginning to golden. Rotate the trays in the oven after 4 minutes of cooking to ensure even browning.


Rest on the trays for a few minutes before transferring to a wire rack to cool completely. Serve with a chunky dip, with a cream cheese spread on top or some other delicious topping. These little flatbreads will keep fresh for up to a week in an airtight container.


Adapted from Delicious Magazine February 2007.

They are also tasty with a gin and tonic (add a spritz of lime if you please) for afternoon tea.

Mango madness Mexican style

It is the silly season here is Darwin. Mango madness has struck. The weather is getting hotter and hotter. The nights are no longer cool. The clouds are becoming gray and ominous, but refuse to open and bring relief. Locals recommend you take holidays to a more ambiant climate. The swimming pools are crowded. Everything becomes sticky and hot. People slow down, rest often, drink more. And the trees are ladden with mangos.

I could not believe it when I heard that mangos were left to rot on trees! How could there be so many of them? How could people not gobble them up? I also couldn't believe it when I saw the price of the various kinds of mangos as the local markets. Only $ 1.50 per kilo! Outrageous! And the differing kinds - bowen, ruby blush, thai...


Inspired by a new cook book, as well as a left over mango, we whipped up this salsa to accompany our tea of fajitas tonight. All of the ingredients were at hand, and the process was particularly uninvolved. The flavours of this salsa are verbose and vibrant. Sweet juicy mango, tangy tomato, searing chilli. Simply delicious.


Mango Salsa

Makes 3 cups or so


Cheek of a fresh mango

1 tomato

¼ large red onion

Fresh chilli, to taste

Juice of ½ lime

1/3 c. fresh herbs

Salt and pepper to taste


Finely dice the mango, after removing the skin. (Reserve the remainder for a smoothy, or more salsa tomorrow!) Half and de-seed the tomato. Finely dice it, as well as the onion. If you desire, de-seed the chilli and finely chop. Place these prepared ingredients in a bowl and mix well. Spritz over the lime juice, sprinkle on the herbs – I had some coriander, as well as mint and parsley from the garden – after you have roughly chopped them. Mix ingredients together again. Season to taste.


Place the salsa into the fridge for around an hour before serving. The flavours will combine together well, with sweetness and heat permeating the mixture.


Serve the salsa as you see fit. Try it alongside guacamole and corn chips. Or on top of chicken fajitas with sour cream and cheese.


Adapted from Jake Tilson’s A Tale of 12 Kitchens.

Thursday, November 5, 2009

Anzacs with a twist...

Anzacs are a real Aussie tradition. They began supposedly during the first world war, when care packages were sent to the troops. As Australia is a long way from Europe, bread and other goodies tended not to last on the journey there. Rather than just send socks, the Aussie women left behind began baking using ingredients that would not perish. So no eggs, not just flour, and something that would work dipped into a hot cup of tea. Thus the ANZAC biscuit was invented. ANZAC stands for the Australian and New Zealand Army Corp, and is the general name given to the Australian war/fighting spirit. And the biscuit is a childhood staple for many.

My mother used to make Anzacs just before we got home from school. They were hot and soft and delicious. Unfortunately I was put off them after a Home Ec class in year 7 of my education. These bickies get harder the longer they are left in the oven, so hard they can break teeth. I didn't believe the teacher when she told us this, and I cooked my batch for far too long. They were inedible. And I stopped making them.

This recipe though was made before I realised what I had actually done. It was only when there were in the oven that I realised I had just created. I was shocked. No eggs, lots of flour, being held together with golden syrup. I had made the great Aussie biscuit without knowing it! It was the figs that sucked me in, if the truth be known. I love a dried fig, and wanted a "healthy" treat for a work morning tea. And thus I've been converted back to the Anzac fold - so long as there is dried fruit embedded in them!

Figy Anzacs
Makes around 16 biscuits

1/2 c. plain flour
1/2 tsp bicarb soda
75 g raw sugar
75 g oats
100 g dried figs, finely chopped
75 g butter
2 tbs golden syrup

Pre-heat oven to 170 o C. Ensure oven shelves divide the oven into thirds.
Sift flour and bicarb together into a large bowl. Add the sugar, oats and figs. Stir to combine.

In a small saucepan over medium heat, combine the butter and golden syrup. Stir occasionally and wait until they have melted together. Remove from heat and leave to sit for around 3 minutes.

Pour the butter mix into the dry ingredients. Stir well to combine. Using your hands, shape the mixture into golf ball sized rounds (or just slightly smaller). Place onto lined baking trays.

Bake in oven for 13 minutes, rotating the trays after 8 minutes of cooking time. Remove from oven, cool slightly on the tray before transferring to a wire rack to cool. Store in an airtight container.

Adapted from Delicious Magazine Nov 2003. Original recipe by Jane Clarke.

Tuesday, October 27, 2009

Pork, thinly pounded please.


Meet hammer at work, originally uploaded by the_bashful_owl.

My favourite item in the kitchen may just be the meat hammer. Strange, as I simply adore my Ruby Red KitchenAid (I think that Ruby Red is her name, which is tragic) and would rescue her if a cyclone was coming. Ruby Red's twin-brother food processor comes close. As does the microplane (oh for perfectly grated cheese, garlic, ginger, chocolate, etc). I have some heart-shaped measuring cups, which are kitch and cute. I have an amazing heavy-based frying pan, which even the fella values. So why the meat hammer?

It is rarely used for one. It is old fashioned and speaks of my grandmother's era for another. I recall one as a child, peaking out of mum's utensil canister. It was one kitchen item I longed to play with, and often was permitted to. I love the big squares on one side and the little ones on the other - patterns, texture... I love the sound it makes when you are whacking your meat. I love the idea of being part of making your meal, so although I'm not doing the butchering I'm part of getting the meat to the table.

My pork intake is limited. At times it really puts me off in its porky form. Bacon, yep, ham, mmm hmm, pancetta, absolutely. But slabs of pork I'm not so sure about. Pork squashed thinly with a meat hammer, coated in crumbs and cheese, lightly fried until golden sounds okay though. When we need a "traditional" meal midweek at our house, this is what we eat. And my fella could consume up to half a dozen of these babies in one seating if they were offered to him. We also cook this dish as it is something we can prepare together. Someone has to make the breadcrumbs in the processor while someone is smashing up the pork chops. The fella cooks to pork to perfection, while I steam the veggies in the microwave and rummage for the mayo in the fridge. And whole egg mayo it must be please.


Fryin' up the pork, originally uploaded by the_bashful_owl.

Crispy Pork Chops
Serves 2 – 4 (4 at a pinch).

2 pork loin chops, bone in around 150 g each
1 egg, beaten
1 tsp mustard
1 tsp dried thyme
2 ½ c. freshly made breadcrumbs
½ c. grated pecorino cheese
Pepper to season
Olive oil
Butter if desired


Using a meat hammer, thin out your pork chops until they are a bit less than 1 cm thick. If they end up huge in size, chop them in halt to have one bony bit, one fleshy bit.

Beat together the egg, mustard and thyme in a wide shallow bowl. Combine the breadcrumbs, cheese and pepper on a plate. Dip your pork pieces into the egg mix, making sure they are covered well. Place on top of breadcrumb mix. Pat down, turn over and repeat. Try to get a thick even coating all over the pork. Place on a wire rack to dry while you prepare the remaining meaty bits.

Heat oil in a solid frying pan. Add a little butter if you wish. When things are hot, yet on a medium heat, cook the pork chops for around 5 minutes per side. You made need to cook them in batches.

Serve with freshly steamed broccoli, plenty of real mayonnaise and some more mustard. A slice of bread is nice too, as is some boiled potatoes.

From Nigella’s Feast by Nigella Lawson.


Crispy pork chops, originally uploaded by the_bashful_owl

Monday, October 26, 2009

In case of an emergency, bake these!


An earthquake struck Darwin town around midnight on Saturday/Sunday. And what a shock that was! I was lying in bed reading when all of a sudden the bed started rocking. And the mirrors of our built-in robes were visibly moving, and the walls were making noises. My screams of the fella's name were futile. "He must have fallen asleep in front of the telly" was my conclusion. Nope, rather he was standing very still in the middle of the lounge experiencing the quake with all limbs extended in order to feel the full force of the earth's movements.

My worries were that I may need to evacuate the building if it got worse. How would we get downstairs? Were lifts safe to use in case of an earthquake? Would I need to get some clothes on or was it okay to be nudie while escaping a collapsing building? What would we eat for breakfast if the fridge fell through the floor to the apartment below?

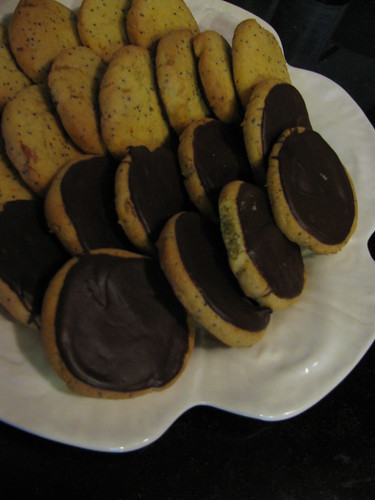
Thankfully I had a roll of these orange and poppy seed biscuits stored in the freezer, perfect food to enduring an earthquake. Baking them only takes 11 minutes, and the quaking lasted almost this long. So in case of an emergency, I recommend having some of these delicious biscuits ready to go. They may not erase the embarrassment of a nudie run down five flights of stairs in the middle of a little earthquake, but they will win friend and influence people. Once your face has returned to its normal colour and the earth has opened up and swallowed you whole.

This recipe is from one of my favourite baking blog queens, Joy the Baker. She bakes, with attitude and sass. Oh how I love her recipes, and her dedication to her craft. This was one of the first recipes I tried of hers, and it is the one I come back to most often.

Orange and Poppy Seed Biscuits
Makes around 48...

2 c. plain flour
½ tsp. bicarb soda
½. tsp salt
2 tbs. poppy seeds
1 c. sugar
Zest of 1 orange
150 g. butter, softened
1 egg
1 egg yolk
1 tsp. vanilla essence
1 ½ c. chocolate bits


In a bowl, sift together flour and bicarb soda. Add the salt and poppy seeds. Stir well to combine.

In another bowl, combine the sugar and orange zest. Smash it around a little to get the sugar well into the zesty bits.

In your mixer, beat the butter for 2 minutes until soft and smooth. Stir in the sugar and zest. Mix for two minutes. Add the egg and yolk, mix until just combined. Add the vanilla and mix for a further two minutes. Reduce the mixer’s speed to low, add the flour mix until just combined.

Divide the mixture in half, shape into two logs of around 5 cm in diameter. Roll up each log in baking paper. Place in the freezer for at least thirty minutes to firm up. They can be frozen for up to four weeks, and then you are only fifteen minutes away from biscuits! Such a great idea.

When ready to cook the biscuits, pre-heat the oven to 180 ⁰C. Line two trays with baking paper. Unwrap one log, slice into 5 mm thick slices. Place onto the trays a few centimetres apart. Cook in oven for 11 minutes, rotating the trays half way through cooking. Cool slightly on the tray before cooking on a rack. Repeat the baking process as needed.

When the biscuits are cool, melt your chocolate. Using a knife, spread the bottoms of the biscuits with melted chocolate. Allow to set, maybe in the fridge if needed.

From Joy the Baker.


With tea perhaps..., originally uploaded by the_bashful_owl.

In times of trial and urgency, I also recommend a good cup of tea. Such as this Melbourne Breakfast from T2.

Tuesday, October 20, 2009

Crumbling...


Egypt: Karnak, originally uploaded by Brooklyn Museum.

Crumble (verb): break or fall into small fragments; gradually disintegrate.

At times in life, things seem to crumble. One's hopes and dreams, relationships, careers, one's health, houses, old treasures such as letters and timber items.

Crumble (noun): dish of stewed fruit with a crumbly topping.

At times in life, one needs crumble. Preferably made with apples or rhubarb. Or dotted with blueberries. Or sprinkled with almonds and dried apricot pieces. Or made with pears and strips of orange zest. And swimming with custard. Even served in little tea cups. Or spooned out from a big bowl. Mmm, crumble.

This crumble was made for a dinner we had over the weekend. I slow cooked a chicken, lemon and garlic dish, as well as roasted potatoes in the oven. Things were timed to perfection, with minimal fuss at the last minutes. But then the guests were late, around 45 minutes late. So the meal was dry and lacking in lusciousness. Hurrah for the crumble, the dish that saved dinner. As my culinary prowess crumbled around me, the crumble won hearts...

Typically I would make my crumble using sugar syrup to poach the fruit in. This method instead cooks the apples in butter, ensuring they maintain some texture as well as their shape. The port adds depth of flavour and is beautifully enhanced by the sourness of the berries. The crumble topping is how I make crumble, with lots of texture and taste. None of this breadcrumb only crumble for me please.

Apple, Raspberry & Port Crumble
Serves 6 to 8 with custard and ice cream.

20 g butter
6 apples, peeled, cored & diced into medium pieces
300 g frozen raspberries, slightly defrosted
300 ml port
185 g sugar
½ tsp ground cinnamon

Crumble topping:
60 g butter, softened
½ c. plain flour
½ c. raw sugar
½ c. oats
½ c. desiccated coconut

Pre-heat your oven to 180 ◦C.

Over a medium heat, melt butter in a large saucepan. Add the apple pieces. Stir well and cook for around 10 minutes until softened. Add the raspberries, port, sugar and cinnamon. Cover and cook for 8 minutes.

Using a slotted spoon, remove fruit from the cooking liquid and transfer to a suitable round cooking dish. Continue to cook the liquid uncovered until it reduces to a syrup-like consistency. This may take up to 10 minutes. Stir it occasionally to ensure it does not catch and burn on the bottom. Pour this liquid over the fruit.

Make the crumble topping by combining all the ingredients. Mix it together well, rubbing the butter into the other ingredients. It is messy, but easy to do with your hands. The mixture should be chunky rather than sticky, getting towards being like breadcrumbs but not smooth. Crumble the topping over the fruit.

Bake in the oven for 35 minutes, until golden in parts.

Serve hot with ice cream, warm with custard or even cold with yoghurt for breakfast the next day.

Adapted from Delicious magazine August 2007.

Sunday, October 18, 2009

Saturday morning muffins...


Up Side Down Muffins, originally uploaded by the_bashful_owl.

When I wake up on Saturdays, all I want to do is stay in bed, hug my fella and have breakfast magically appear on a tray for me. In reality, I wake up too early as my body has adjusted to working from 8 a.m., my fella is snoring away and no one had put the coffee on to boil. Drats!

But this Saturday was close to perfection. A late start after a late night so somewhat of a sleep in, video hits raging on telly, two pots of bialetti coffee brewing away and a few ripe bananas screaming out to be transformed. No pancakes this day though, as I was after a more labour-less approach to my morning. Rather, a minimal mix of a few bowls, a sprinkling of chocolate chips, twenty-five minutes later, and hot fresh muffins were there for the taking.

My somewhat slimmed down hips should have been protesting. Muffins for breakfast is really just eating cake. Particularly if they contain chocolate. But these have very little sugar, and lots of fruit in them. Or so I told myself...

Banana Chocolate Chip Muffins
Makes 7 giant ones.

2 c. self-raising flour
½ c. sugar
½ c. small chocolate chips
2 ripe bananas, or so
1 c. milk
1 egg, lightly beaten
20 g butter, softened
Spray oil, or similar for greasing your muffin pans

Pre-heat your oven to 180 ◦C. Grease a 6-hole Texan muffin tray with a spray of oil.

Sift the flour into a large bowl. Add sugar and chocolate chips. Stir to combine.

In a separate bowl, mash your peeled bananas. Pour in the milk, the beaten egg and some butter. Whisk it all together. It won’t be smooth, but try to get the butter broken up a bit.

Combine the wet ingredients into the dry ones. Give it a really light mix, just making sure you don’t have big streaks of flour throughout your mixture. Spoon mix into the muffin trays, until they are around ¾ full.

Bake in the oven for 25 minutes, until risen and golden. Cool in the tray for 5 minutes, before turning out onto a wire rack to cool. Unfortunately I find that this makes just a little too much to only make 6 muffins. You will need to rinse out the pan, re-grease and bake the final muffin. If you only use 1 banana it will make 6 muffins, but then they are less banana-full in flavour. Tough decisions...

Serve warm. With coffee. Hot butter spread over is optional, but a necessity if you are my fella. These don’t keep for too long, so make them if a crowd is coming over. Or keep them in some Tupperware and microwave for 15 seconds before eating a day later.

Adapted from the Table to Table, Trinity Church Cookbook.

Friday, October 16, 2009

The fruits of the sea

We live so close to the ocean, it seems a waste not to make the most of it! But in reality, I've not once swam in the ocean in the Northern Territory nor do I make regular visits to the beach.

You see, there a no waves here. And waves for me are a huge appeal. Neither is it safe to swim. When one thinks of the Northern Territory, crocodiles generally come to mind. Sure, they are out there but they are not the main reason swimming in the beautiful ocean is generally only for the fool-heartedly brave. It's the stinging jelly fish that get you. The stingers are present year round, but particularly bad from October to May (which is when everyone is desperate to swim as it is so hot). And these stingers are serious - particularly if you are a child, elderly or have anything serious wrong with your health.
So my recent attempts to get the most out of being surrounded by water have involved the following: sipping cocktails from my balcony overlooking the water, eating fish and chips from the wharf, and purchasing locally caught fish from a supplier just down the road. The supplier is called Mr Barra and he stocks a wide range of seafood. Barramundi is his particular specialty. And these barramundi are so delicious, stuffed with lemon and fresh herbs, wrapped in paper and roasted in the oven... He also has locally caught banana prawns, scampi, jew fish, snapper...

The recipe that follows is a taste of the Top End. Prawns, freshly peeled and gently cooked. Lime zest from a local tree for that bit of zing. Perhaps there are a few things about it that aren't right, but it seems to work. I'm sure many Italian mamas would be stamping their feet at the idea of prawns and cheese. But cheese makes a risotto so creamy. And personally I struggle to make risotto and not include peas (risotto is so Italian, Italy is so Venice, Venice is known for the fresh peas in local meals).

Adapted somewhat from Donna Hay Magazine May/June 2006.

Lime, Prawn & Pea Risotto
Serves 6

1.5 L stock (veggie, chicken or fish)
20 g butter
1 tbs olive oil
2 cloves garlic, finely chopped
1 onion, finely diced
1 stalk celery, finely diced
2 c. aborio rice
¾ c. frozen peas
12 raw prawns, peeled and de-veined
Zest of 2 limes (or lemons if you will, or oranges...)
½ c. finely grated pecorino cheese
1 c. finely grated cheddar cheese
Salt and pepper to taste

Over medium heat, with lid on, bring stock to the boil. Remove lid, reduce the heat to low and simmer the stock very gently while you make the risotto.

In a solid, large saucepan melt the butter mixed with olive oil over medium heat. Add the onion, cook while stirring occasionally until the onion is translucent. Add the garlic and celery, cook for a further few minutes until the celery is softened somewhat. Add the rice, stir to coat and cook for two minutes.

Add a ladle-full of hot stock, stir while the liquid is absorbed. Continue to add the stock one ladle at a time until the rice is soft but still has some shape and texture when tasting it. This will take up to twenty-five minutes, so get a glass of wine, put on the news or some enticing tunes and stir away. If you stop stirring, it is likely that your risotto will stick to the bottom of the pan. This won’t be good. Persistence in stirring will pay off.

Stir in the peas and prawns. Mix well. Stir in the zest. Mix a little more. After three minutes, stir in the cheeses and mix for two minutes more. By this time the prawns will be cooked and delicious. Taste and season accordingly.

Serve risotto in shallow bowls. A glass of wine is mandatory. A salad on the side is optional.

Thursday, October 15, 2009

Leftovers for lunch...

Leftovers. Don't you love them? Have you ever loved a meal so much you made it just for the leftovers? I certainly have. To me a leftover is a perfect lunch the next day. A lady at work this week was saying that she only makes meals that can be leftovers! She lives alone, and will always prepare enough food for four people. She eats her fill, then puts the leftover serves into Tupperware and freezes them. When re-heating, she will add a few veggies perhaps (particularly if she has made a red chicken curry).

Now leftovers scream of a number of personality traits being needed to create them. One is that of a planner, who, like the woman from work, thinks ahead and is prepared. Another is that of the lazy person, who can't be bothered cooking so eats whatever is in the fridge. Another is perhaps a greedy guts, who always cooks far too much but longs to eat it. Which am I...

So, what is the best leftover meal? Lasagna is one dish that is certainly more solid the following day. And a curry always tastes better after being reheated. Pizza is good, but if microwaved becomes too soggy. Somethings dry out, others become smoosh. Others are perfection and made to be eaten later. My preference is currently pasta Puttanesca. The flavours seem to meld together well, the sauce thickens. It can be reheated without too much drying out, if you grate cheese over it before placing in the microwave. When my fella was away for three months recently, I made this dish once per week in order to have leftovers as it is so good.

Please make and enjoy. Use whatever pasta you like. I love the tube spaghetti. It's chunky yet slippery, so slurp it up.

Puttanesca
Serves 4

300 g tube spaghetti
Good splash olive oil
3 garlic cloves, finely chopped
400 g diced tomatoes
½ c olives, pitted and finely sliced
1 chili, sliced
1 tbs capers, chopped
4 anchovies, chopped
Grated parmesan, to serve


Cook pasta according to packet instructions

Heat oil in frying pan over medium heat. Add garlic, cook for thirty seconds. Add tomatoes, olives, chili and capers. Cook for three minutes. Add anchovies, cook for a further two minutes. The sauce will become thick and delicious. Season to taste.

Pour sauce over cooked pasta. Add parmesan as desired.

Adapted from Australian Table magazine August 2007.

Wednesday, October 14, 2009

Turkish delights...

My husband's family knows he loves Turkish Delight. As a consequence we receive a gift of around 1 kg of the stuff every birthday. If Christmas is a bit lacking, more of it is given then too. At first I thought this was a wonderful thing. But now... When you find melted, gooey Turkish Delight in the cupboard it is more than a little off-putting. Also, there is only so much you can eat without feeling really ill. I've tried this too.

But we don't want the gift that keeps on giving to stop. This is not meant to be a complaint about the generous abundance of Turkish Delight, rather a post celebrating it's joys. For me, I love my Turkish Delight covered in chocolate and flavoured with rose water. I would prefer not to have any coconut on it, I don't mind it studded with pistachio nuts. The sugary-vanilla flavouring it okay, the clouds of icing sugar are messy but enticing. Oh, surely we have some tucked away I can dig into now...

"The Queen let another drop fall from her bottle on to the snow, and instantly there appeared a round box, tied with green silk ribbon, which, when opened turned out to contain several pounds of the best Turkish Delight. Each piece was sweet and light to the very centre and Edmund had never tasted anything more delicious." The Lion, the Witch and the Wardrobe, C.S. Lewis.

So this recent kitchen experiment came out of my love of Turkish Delight. And my love of C.S. Lewis, and a bottle of rose water that was due to expire (who would have thought this stuff had a use-by date?). And a posting on Design Sponge for an irresistible-looking cocktail. I think this is my newest favouritest drink. Now what to do with all of the rose water cordial I made...

Rose water cordial. Delicious, potent stuff. I've tried mixing it with lemonade, and it is very drinkable. I've added some raspberry vodka to it. I've thought of drizzling it over some soaked dried apricots. Perhaps even brushing it over a freshly cooked orange cake. But the winner seams to be the suggestion from Design Sponge. Please try it, I implore you.

This recipe makes a lot of cordial. Maybe too much in fact. But I've stored mine in the fridge well sealed and it seems to be doing fine.


Rose Water Cordial
Makes around 1 L

2 1/2 c. water
4 c. white sugar
1/4 c. lime juice (I used bottled juice)
1/2 c. rose water

In a medium saucepan over moderate heat, bring sugar and water to the boil. Simmer gently for ten minutes, stirring occasionally.

Add the juice and rose water. Return to the boil. Simmer again for a further ten minutes. By this stage the liquid will be thickened and syrupish.

Leave to cool before decanting into cordial bottles. Seal well and store in the fridge until ready to use.

From the Epicurious website, via Design Sponge.

Sunday, October 11, 2009

Christmas preparations, cheers to that!

Christmas is in the air - already?


Sure enough, the supermarkets and department stores have had their decorations out since the first of October. I'm yet to see an ad on telly though, telling me to buy now in time for Christmas. But I'm sure they will come. While it is good to get in early and plan ahead, is this too far in advance? Perhaps.


As for me, I'm trying to be organised. We will be moving across Australia (literally from top to bottom) in the two weeks before Christmas. We are arriving Christmas Eve, and staying in a hotel until some time in the new year. So I'm trying to get ready. I've a few gifts set aside, ready to be wrapped and placed in a clearly marked "do not pack in the removalist truck" box. I'm contemplating when to send out Christmas cards. And most tastily, I've been preparing in the kitchen. What took my fancy was an old copy of Delicious magazine, from years back with lots of Christmas sweet treats to prepare. There were eggnog custards, chocolate and prune terrines, cinnamon ice cream and mulled wine sorbet. Gosh, I'm drooling. None of these are really make in advance treats, but the Christmas pudding vodka certainly is.


Sure, I tinkered with the quantities. I also added ingredients that are essential in my Christmas pudding. I doubled the original vodka specification and increased the infusion time. I also used a vodka recommended by my friendly bottle-o staff. They suggested an organic vodka that had a very "pure" taste and thus would not feature amongst all the Christmas puddingie goodness. Adjust flavours as you perceive necessary. And as for what to do with the delicious vodka soaked fruit, well a chocolate vodka fruit cake is baking in the oven as we speak.


Christmas Pudding Vodka
Makes around 1400 mls

2 bottles vodka (700 mls each or so)
250 g dark brown sugar
200 g sultanas
150 g dried apricots
150 g prunes
Juice and zest of two oranges
2 cinnamon sticks, snapped in half
1 vanilla bean, halved lengthwise, seeds scraped
6 cloves
4 cardamom pods, lightly crushed
2 tsp mixed spice
A good grating of nutmeg

Simply place all the ingredients into a large bowl, or a container you can seal. Stir together well, over and attempt to make the stewing mix ant-proof (mine stood in another container that had a few centimetres of water in the base). Place in a cool, dark forgotten part of your home and leave for two weeks to infuse. Put the vodka bottles aside for later.

Two weeks later, strain your vodka into a jug. Push gently on all the fruit, etc, to get some of the residual liquid out. Strain again and decant into the vodka bottles. Seal well. Alternatively, decant into smaller bottles, label festively and cap tightly. These make lovely gifts.

Serve very well chilled, ideally with a slice of chocolate cake, a fruit mince pie or a velvet chocolate truffle.


Saturday, October 10, 2009

Make me banana pancakes...


Do you debate it in your house? Crepes or pancakes I mean. Which is better? Who prefers what? What will be made? Growing up, my dad preferred the thick, fluffy pancake. Preferably smothered in butter, maple syrup and cream. And perhaps with ice-cream. Rather like the McDonald's hotcakes in fact. I would vote for paper thin crepes, topped with lemon and sugar. They would be rolled into a log and eaten in slices. My sister Rach was a gun at making choc-chip pikelets. Melty chocolate, smothered in dripping butter, napkins mandatory!

More recently, I have been converted to the thick and fluffy side. But with banana if you don't mind. Mmmmmm! Blame it on Jack Johnson if you will:

But baby, you hardly even notice

When I try to show you this

Song it's meant to keep you

From doing what you're supposed to

Like waking up too early
Maybe we could sleep in
I'll make you banana pancakes
Pretend like it's the weekend now...


Sure, I do only make pancakes on the weekend, so there's no pretending about that. But pancakes in our house signals a lazy morning. Waking up late, substituting breakfast for brunch. Brewing an endless pot of coffee in the Bialetti. Raiding the fridge for half-eaten jars of jam... My pick is for banana pancakes, if you please!

This recipe is from one of my most trusted cookbooks, Feast. A few alterations have been made to Nigella Lawson's original instructions. For example, she is light on the sugar. While bananas are sweet, I think a little more is needed. And how she gets 20 pancakes out of it, I'll never know. Read, make, enjoy...

Banana Pancakes
Makes 7

I ripe banana, or two if they are lying around
180 g plain flour
1 tsp baking powder
½ tsp bicarb soda
1 egg
300 ml milk
Splash of vinegar (or use 300 ml buttermilk and no vinegar if you have it handy)
2 tbs sugar
Butter, for cooking

In the bowl of your food processor, combine all of the ingredients except the butter. Blitz until smooth. Transfer into a jug and let it stand for a while. This can be done in the fridge for 30 minutes, and you will get a thick, frothy mixture. If you don’t have a food processor, mash the banana and add it to the liquid ingredients. Combine the dry ingredients after sifting them. Make a well in the middle of these ingredients and stir in the liquids.

Heat a frying pan or your trusty pancake cooker if you have one (ours was a gift that came from Aldi) to a medium heat. Grease the surface of your frying pan with butter on the back of a spoon. You really don’t want your pancakes to be swimming in butter, so this is a measured way of getting grease in without overdoing it. Pour in a good amount of batter, swirl pan around gently to dispurse the mixture and make your pancakes bigger. Cook until lots of bubbles appear and the underside is browning nicely. Flip and cook. Remove to a foil-lined plate. Keep the pancake warm under the foil while you repeat the process with the remaining batter.

Enjoy your pancakes with whatever toppings you prefer. Sliced banana and honey... butter and fig jam... maple syrup and ice-cream... lemon and sugar.